Bookwits Sign Module Guide
Bookwits Sign helps your firm prepare documents, collect electronic signatures, track recipient progress, and keep a completion record in one place — without moving the work into a separate signing platform.The Bookwits Sign data model (simple)
Quick Start (What to Do First)
Step-by-step
Start a signing request when you have a document that needs a signature, initials, a confirmation checkbox, or another client-completed field.
- Go to Bookwits Sign.
- Click New Signing Request.
- Enter a clear name or subject for the request.
- Choose the signing type: simultaneous or ordered.
- Save it as a draft while you prepare documents, recipients, and fields.
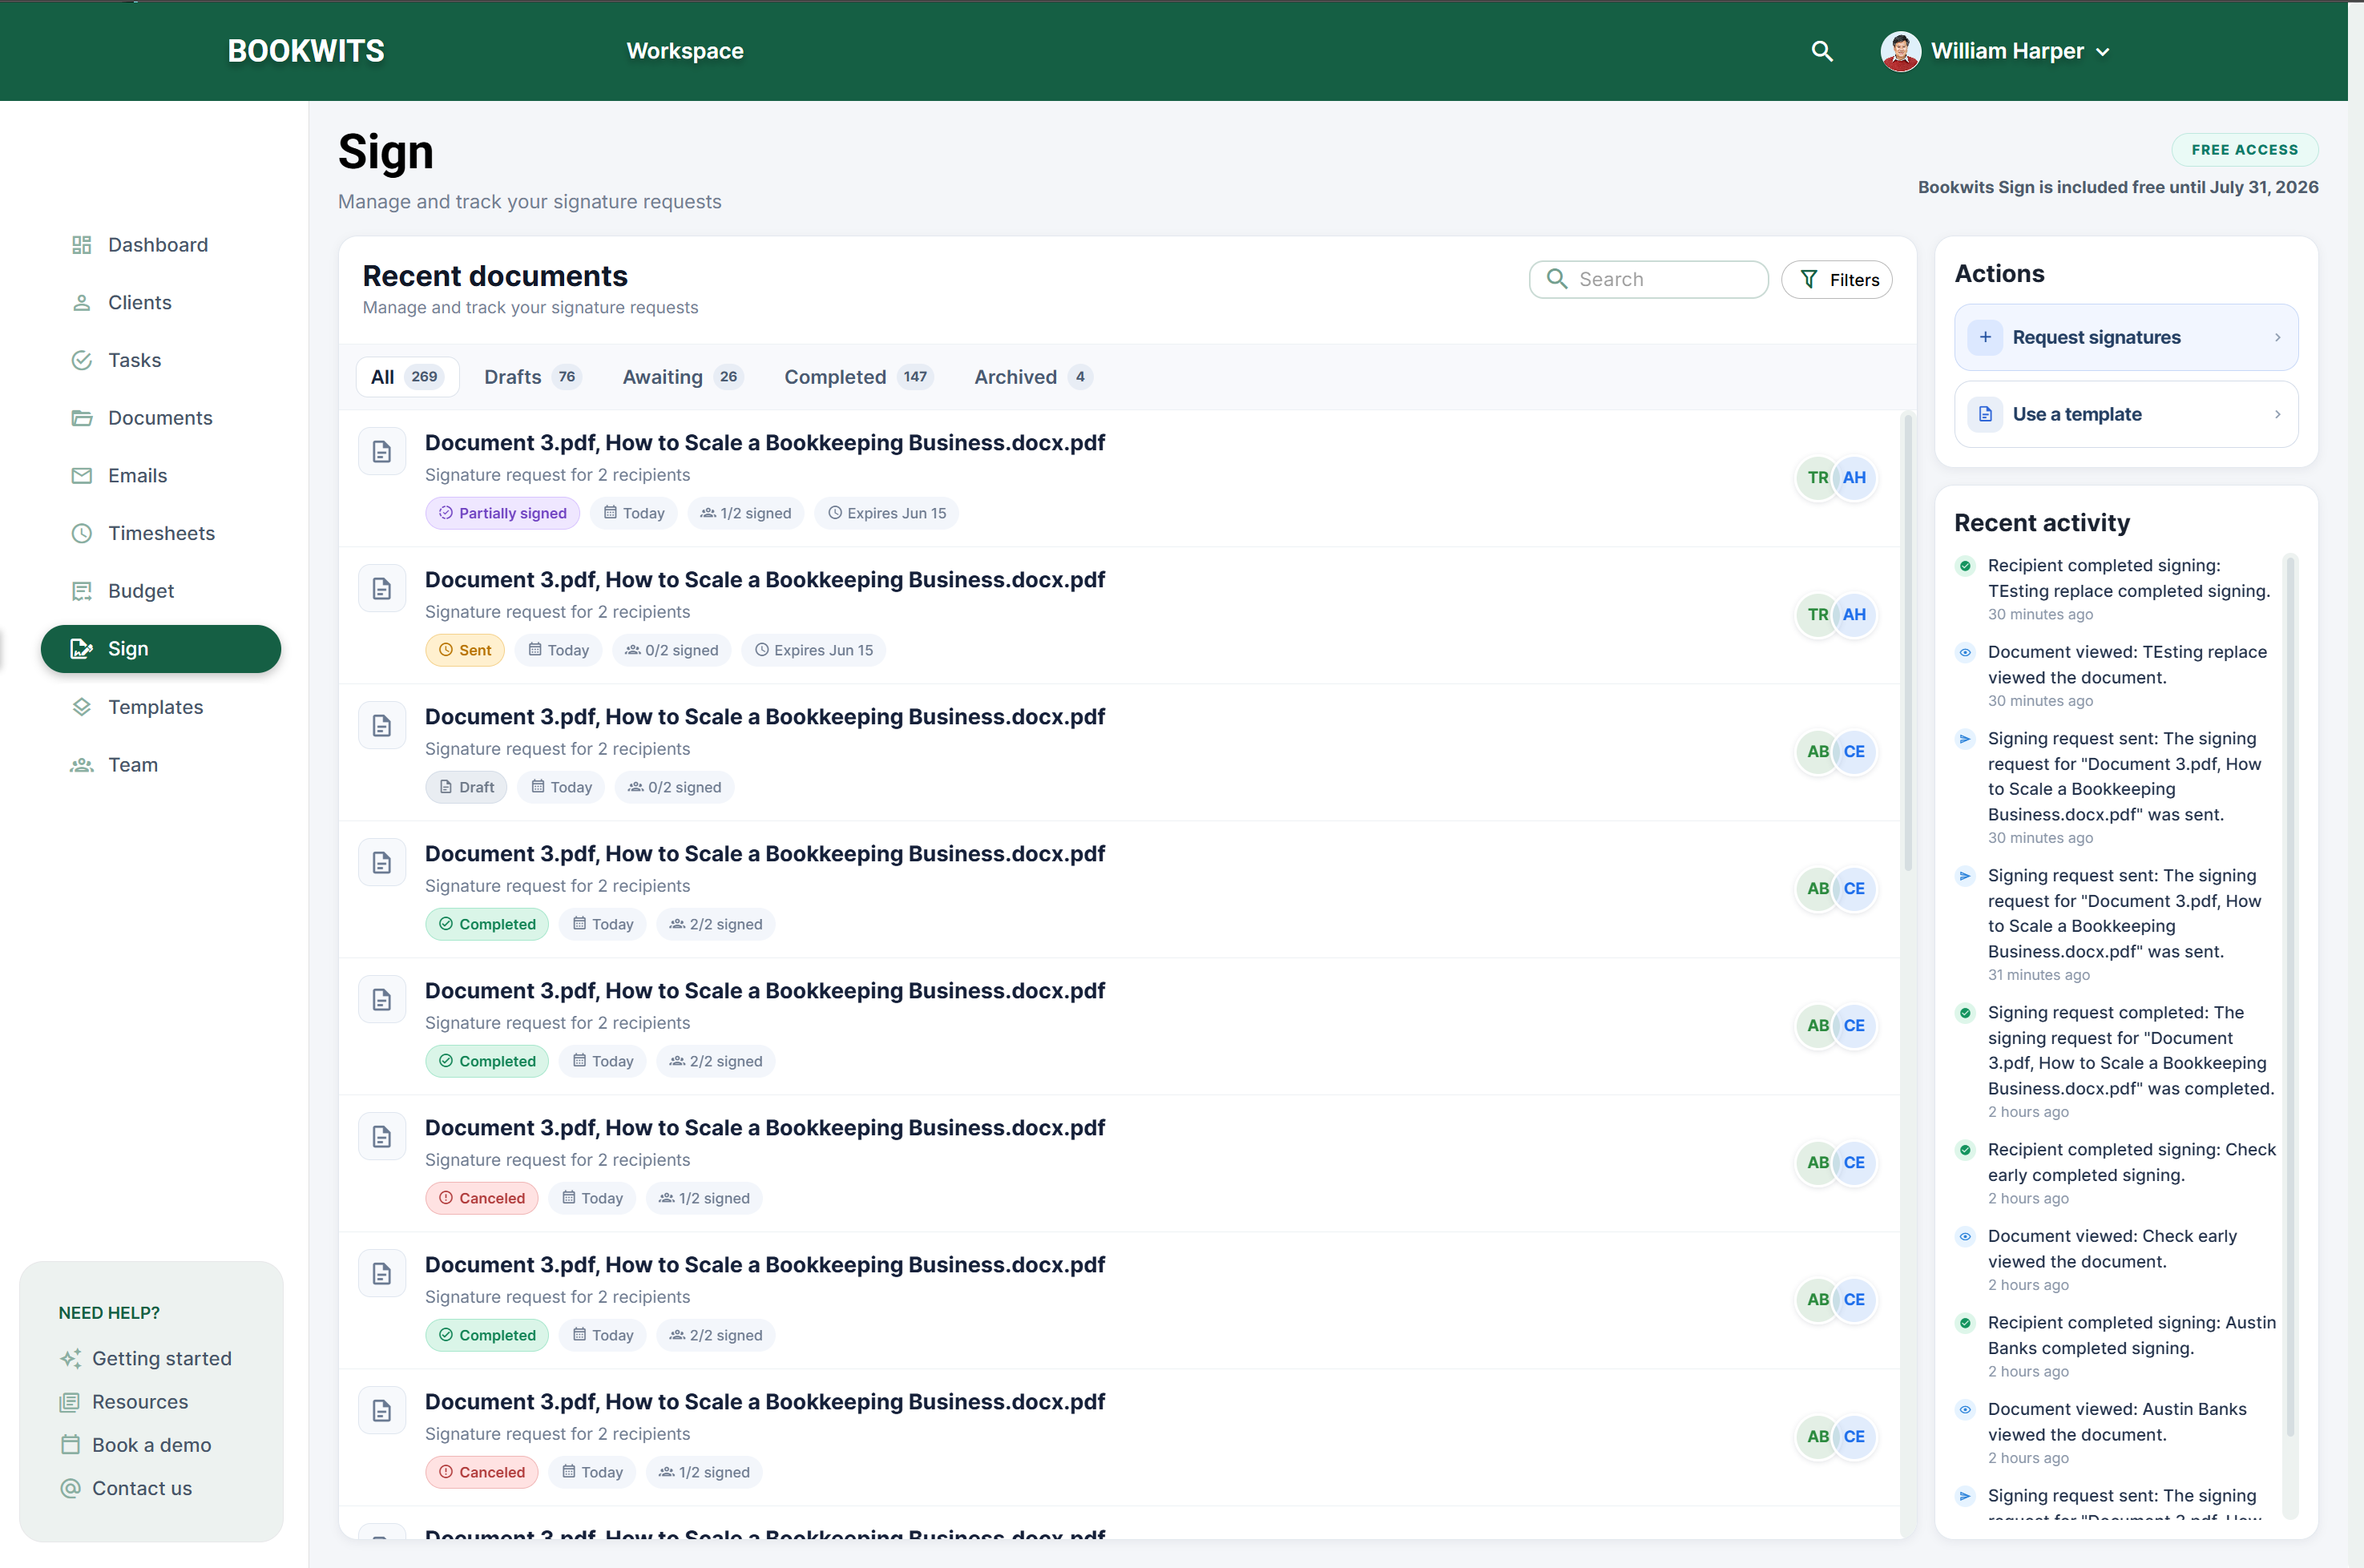
The signing request appears in your list as a draft. Drafts can still be edited. After the request is sent, document and field edits are restricted so the signing record stays consistent.
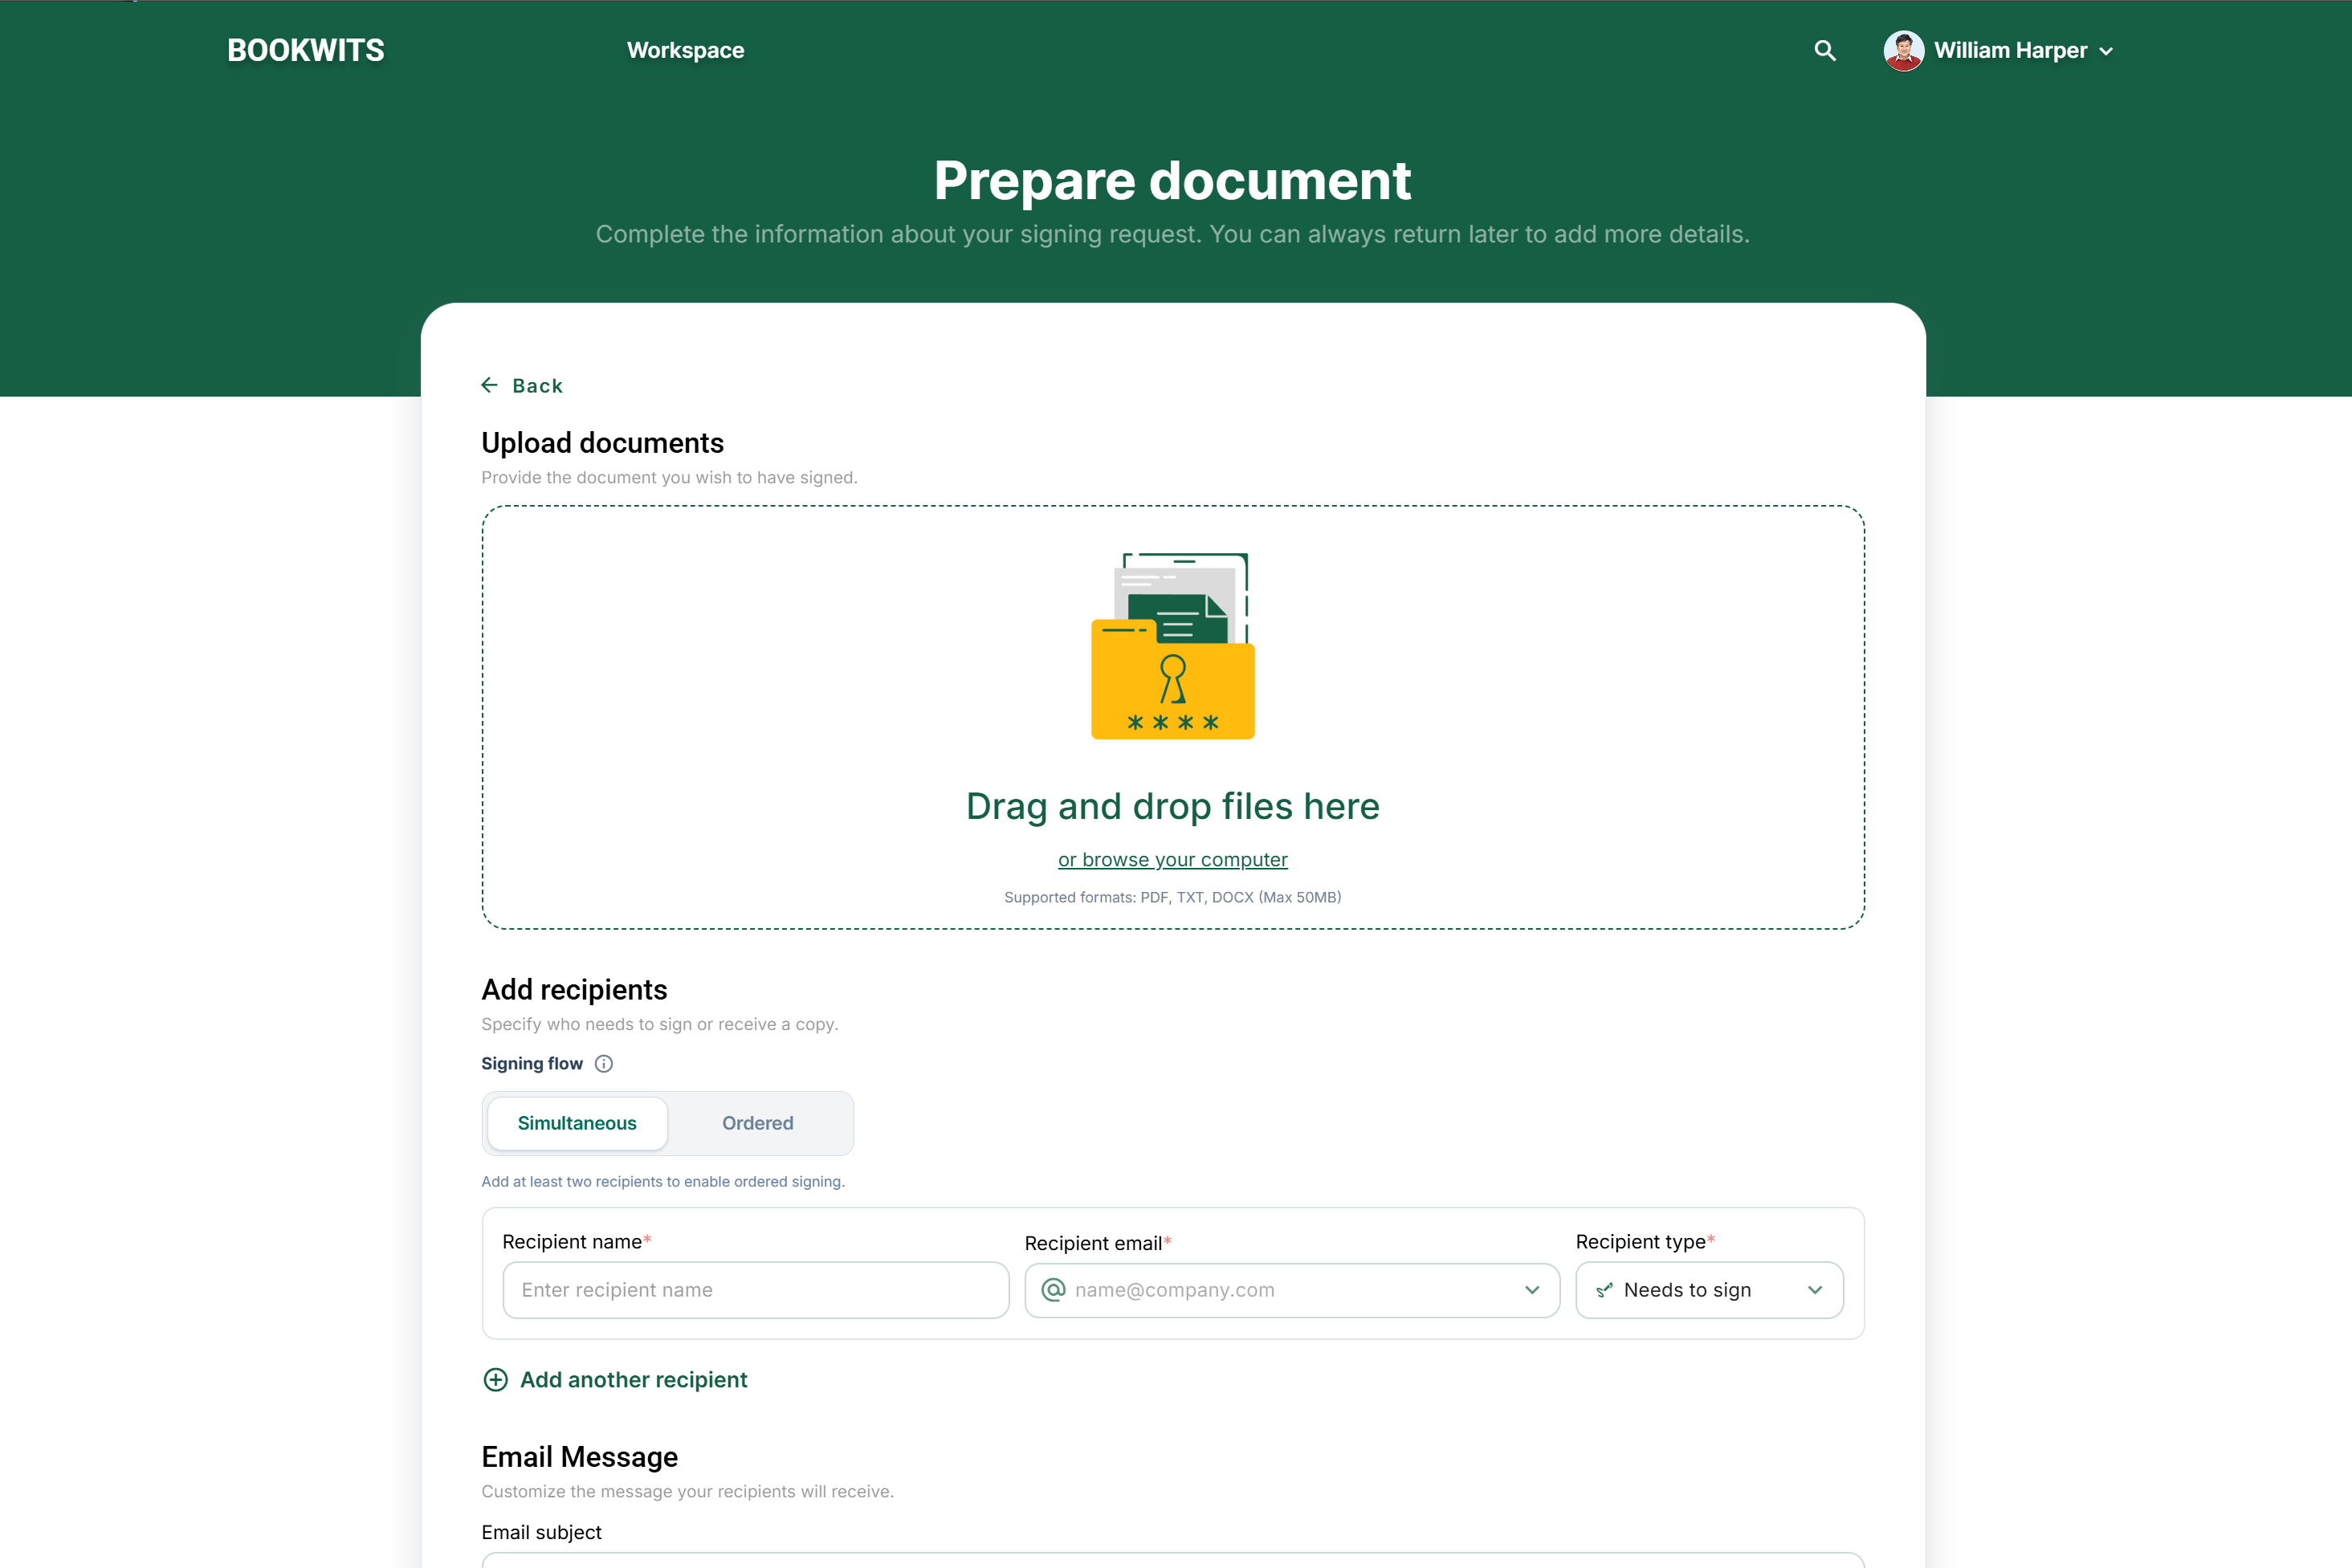
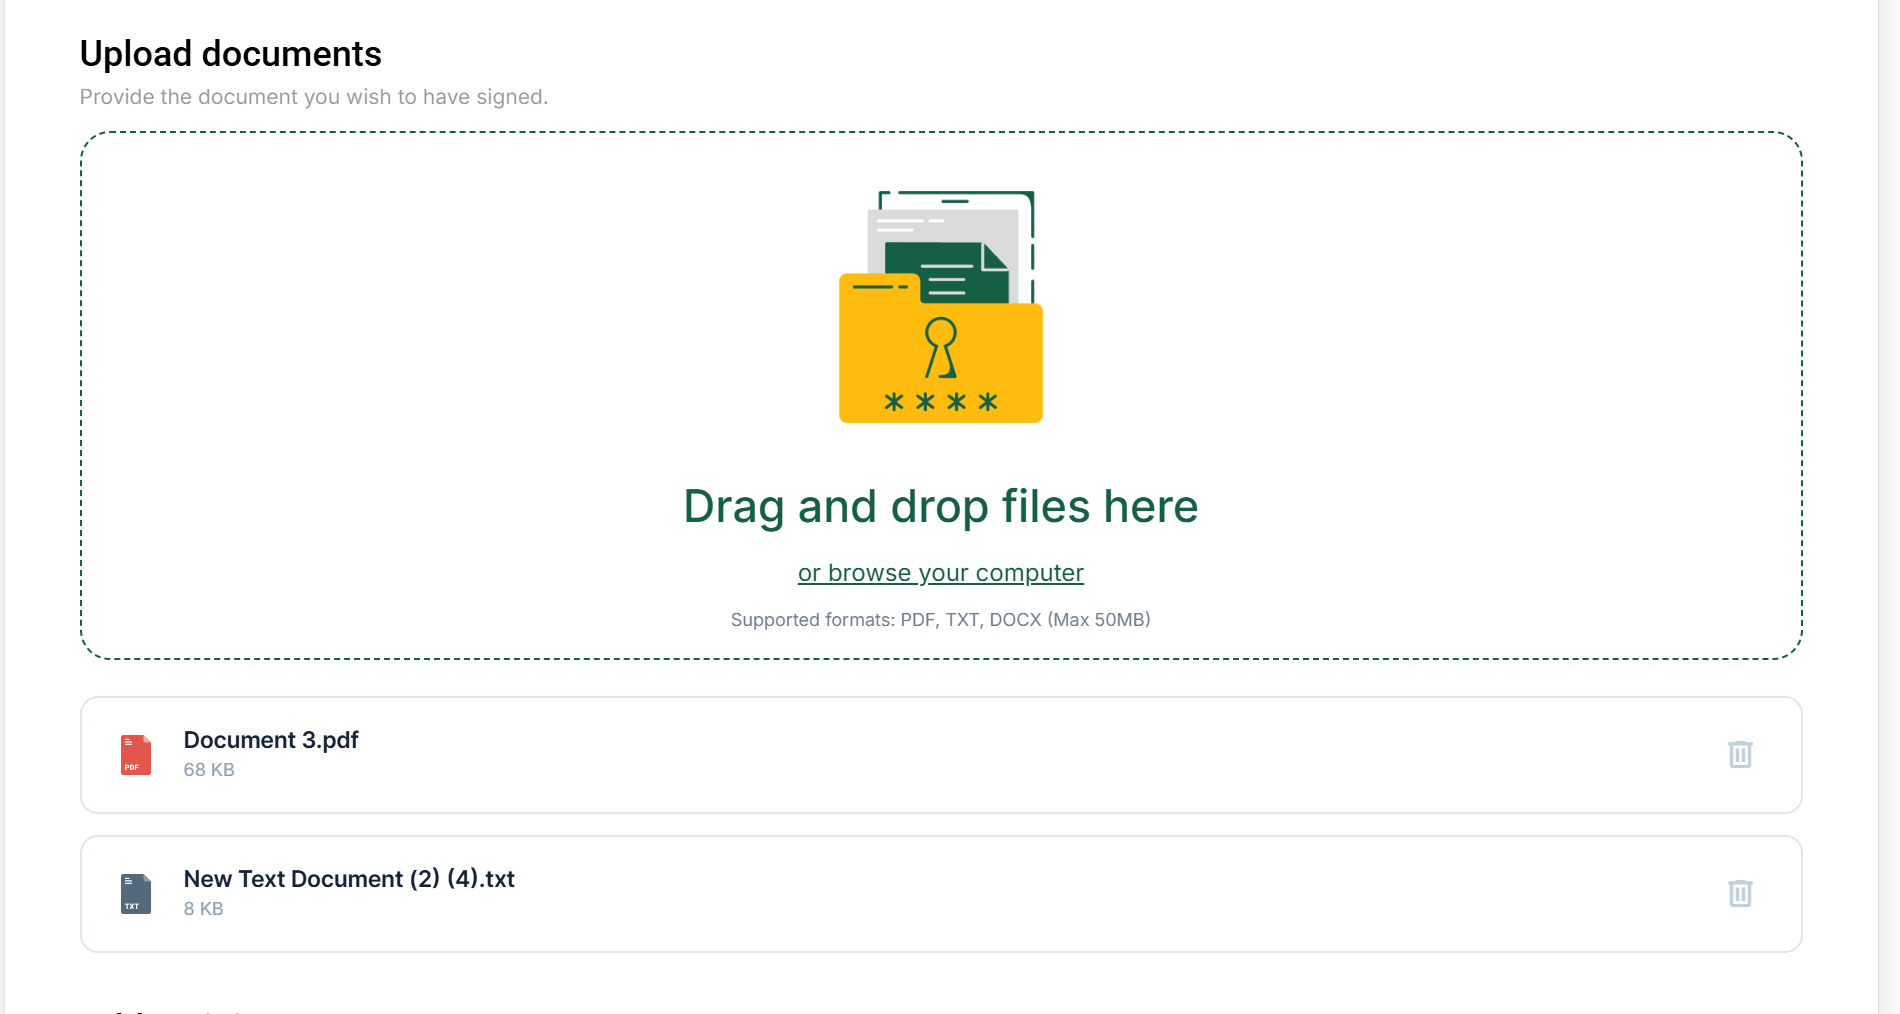
Upload the file or files that the recipient needs to sign or review. You can include one document or several documents in the same signing request.
Bookwits Sign is designed around PDFs for signing. Supported upload workflows can convert common document types such as TXT and DOCX to PDF during upload, then store the signing copy as a PDF for field placement and completion.
- Open the draft signing request.
- Go to Uploaded documents.
- Upload the document or documents.
- Review the preview to confirm the pages look correct.
- Remove and re-upload the file if the wrong version was added.
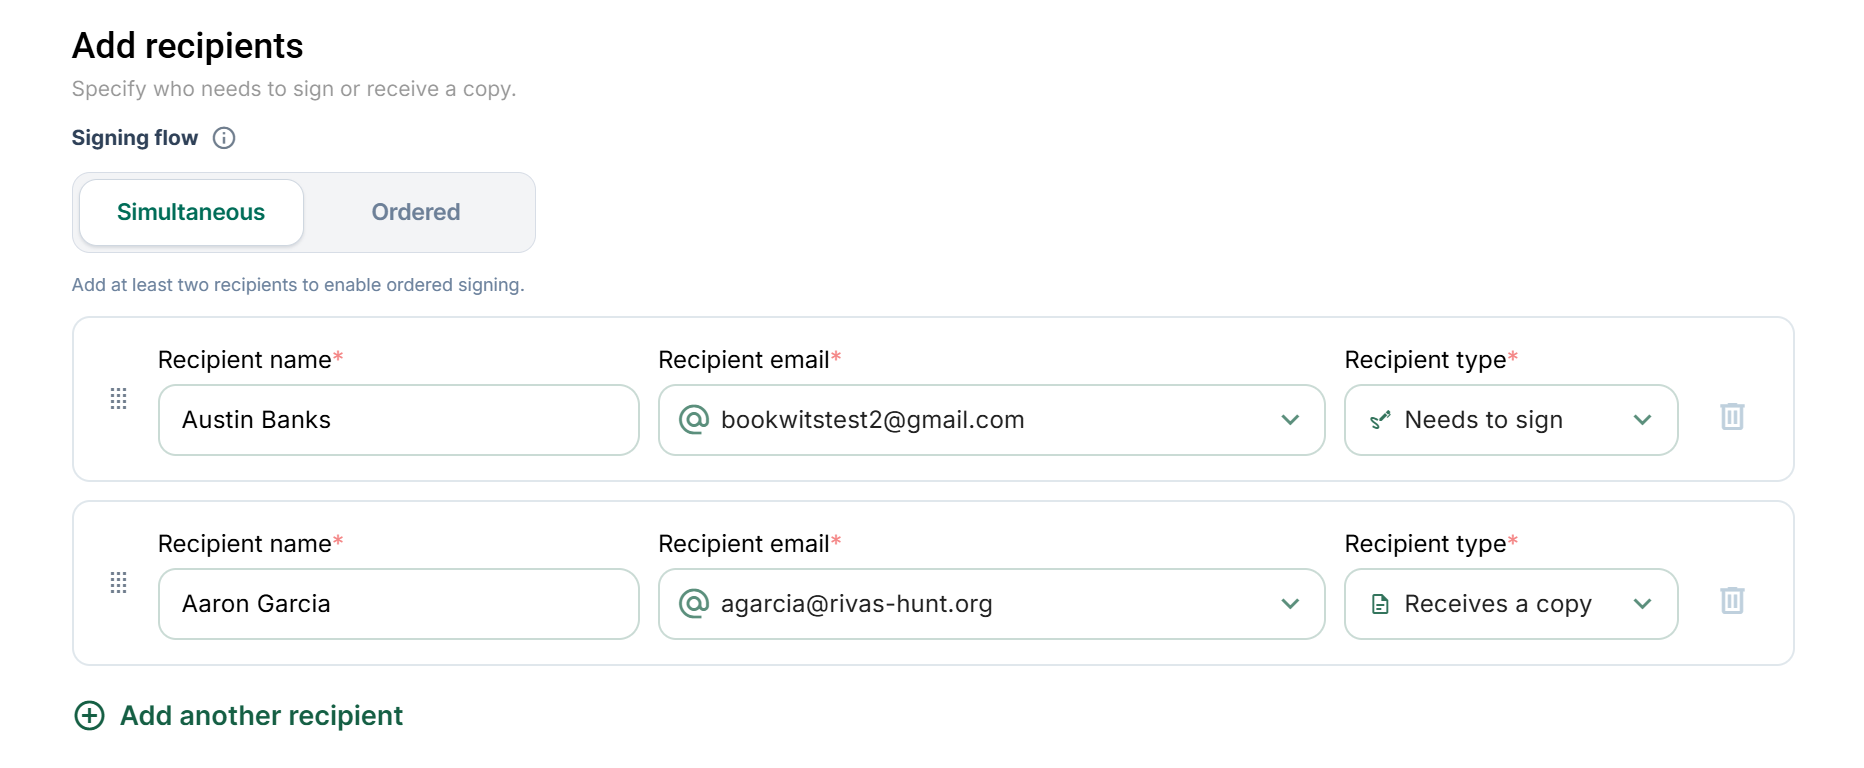
Add every person who needs to sign or receive a completed copy. Recipients can be tied to existing Bookwits clients, contacts, or companies when applicable.
- Needs to sign: receives a signing link and must complete assigned fields.
- Receives a copy: receives the completed document after the signing request is finished, but does not sign.
- Open the signing request.
- Go to Recipients.
- Add the person’s name and email address.
- Choose whether they need to sign or only receive a copy.
- If using ordered signing, set the correct signing order.
- Save the recipient list.
Use simultaneous signing when all signers can receive the document at the same time. This is usually faster for simple forms, consent documents, and cases where the order does not matter.
Use ordered signing when one person must sign before the next person receives their signing link. This is useful for approvals, internal review flows, spouse/director sequencing, or documents where earlier signatures should be visible to later signers.
- In simultaneous signing, all current signers can receive the request at once.
- In ordered signing, only the current order group receives the active signing link.
- After the current signer completes, the next recipient in the order can be notified.
- Recipients who only receive a copy are not asked to complete fields.
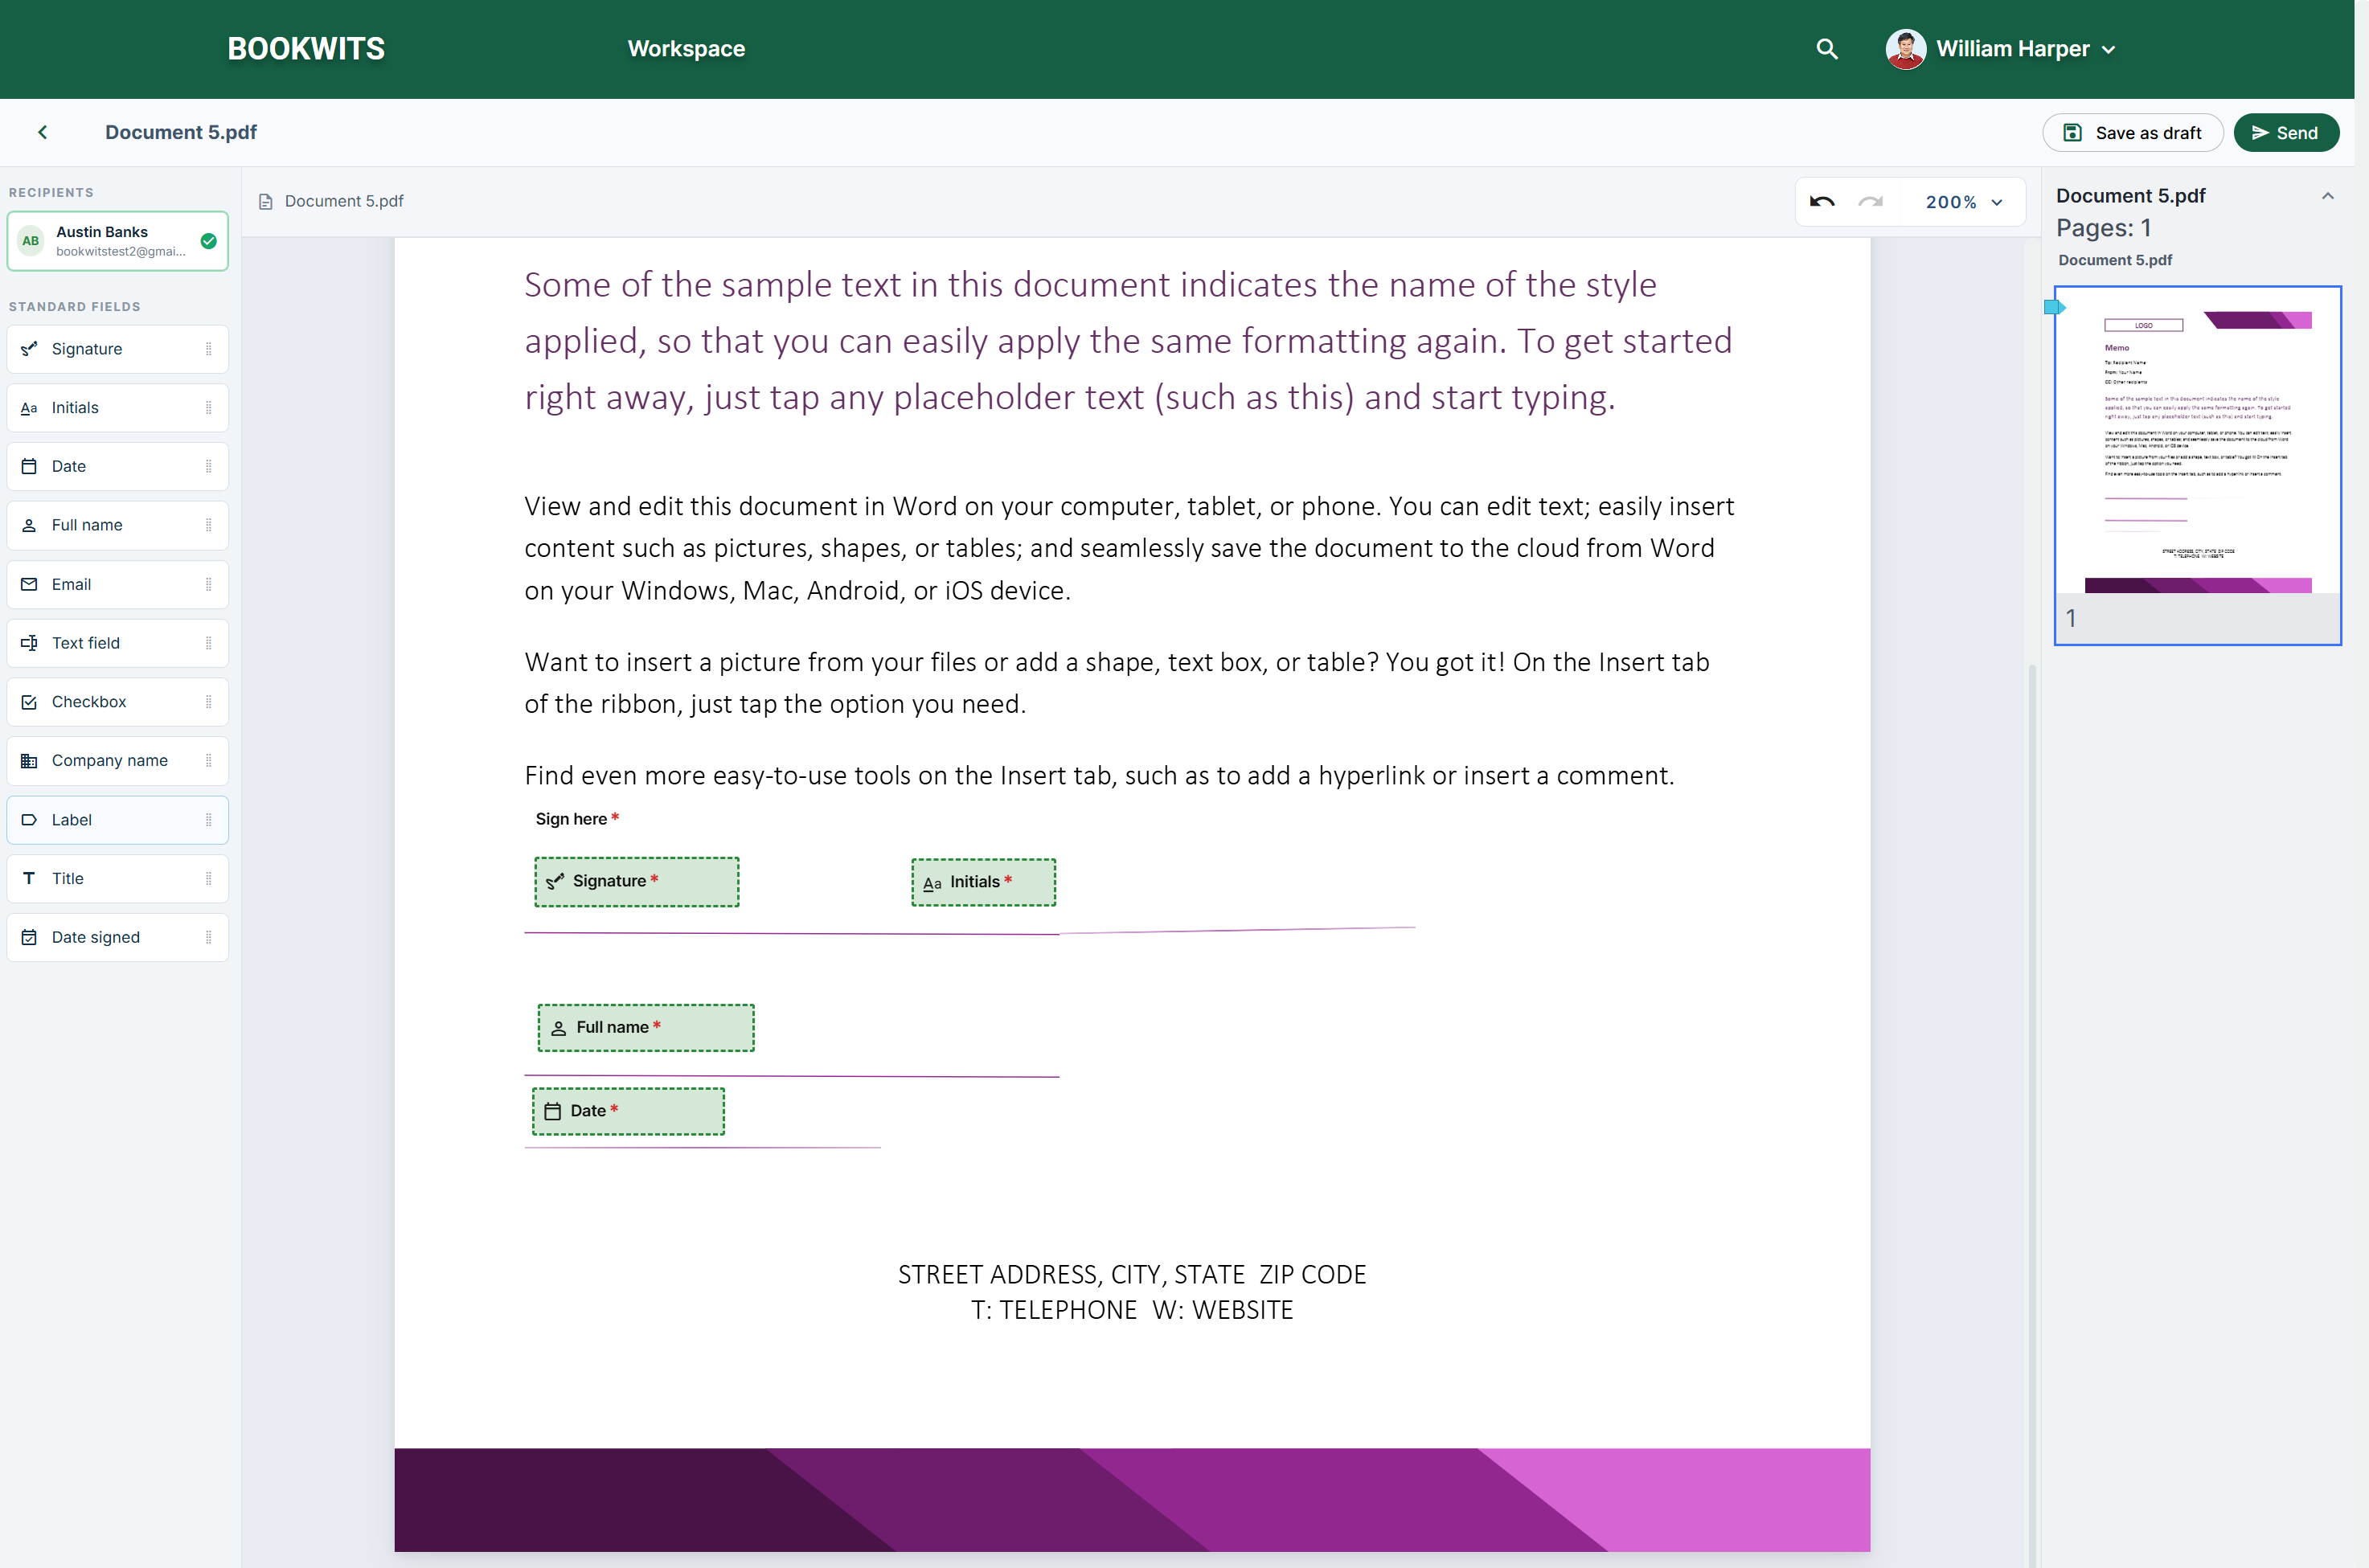
Place fields after your documents and recipients are added. Fields tell Bookwits exactly what each recipient must complete and where it should appear on the final PDF.
- Signature: captures the signer’s signature.
- Initials: captures initials for pages or clauses.
- Date / Date signed: adds the relevant date.
- Full name / Email / Company name / Title: fills identity fields.
- Text field: lets the signer type a short answer.
- Checkbox: lets the signer confirm an option or acknowledgement.
- Label: adds non-editable helper text or instructions.
- Open the document preview in the signing request.
- Select a field type.
- Assign the field to the correct recipient.
- Drag the field to the correct place on the page.
- Resize the field if needed.
- Mark required fields as required.
- Repeat for every signer and every document.
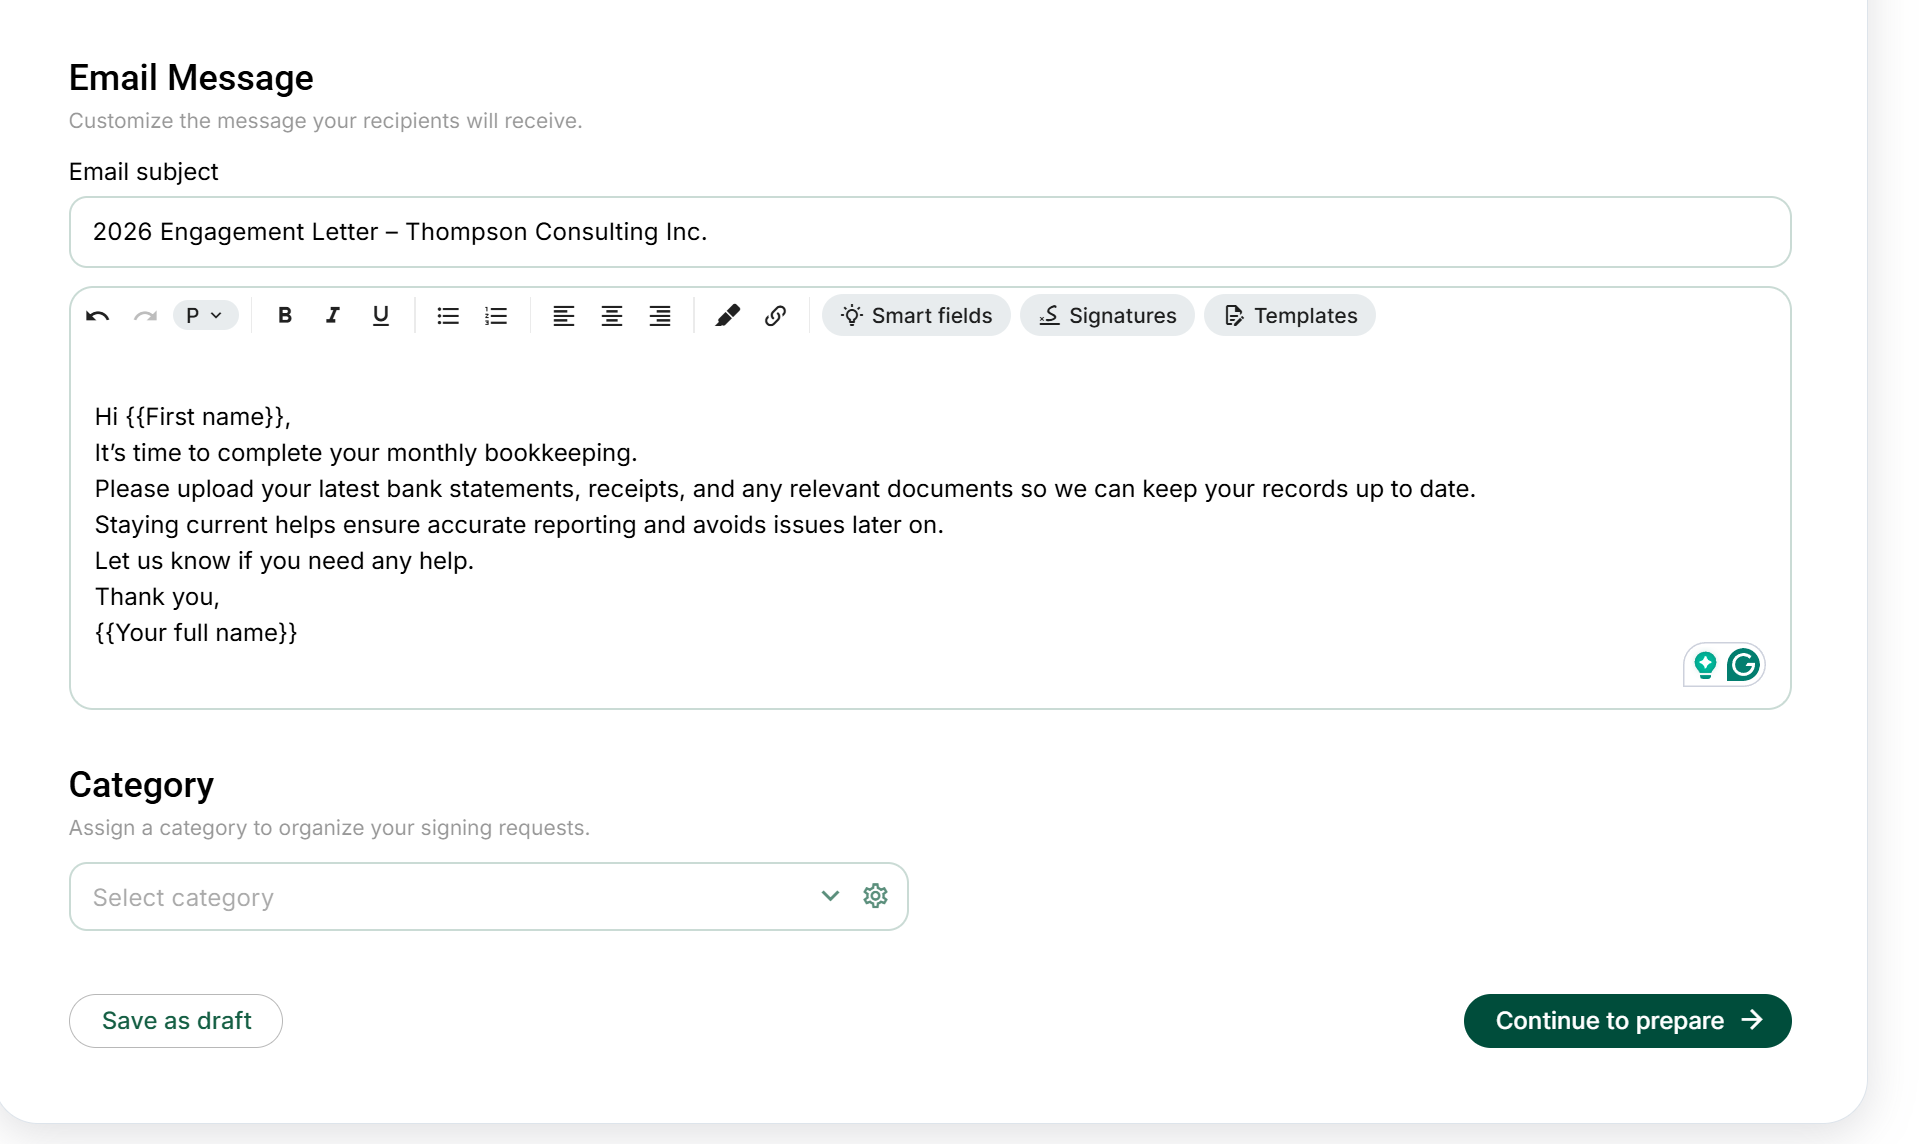
Send only after the documents, recipients, and required fields are complete. The email message is what recipients receive with their secure signing link.
- Open the signing request.
- Review the email subject and message.
- Confirm the recipient list.
- Confirm every signer has at least one required field.
- Click Send.
Each signer receives an email with a secure access link. They open the document, review the content, complete their assigned fields, and submit their signature. Recipients who only receive a copy do not sign; they receive the completed documents after the request is finished.
Use the signing request status to know whether it is still a draft, waiting on recipients, partially signed, completed, declined, expired, cancelled, or archived.
- Draft: not sent yet and still editable.
- Sent / Awaiting: sent to at least one recipient.
- Viewed: a recipient opened the document.
- Partially signed: at least one signer has completed, but not all required signers are done.
- Completed: all required signers have completed the request.
- Declined: a recipient declined to sign.
- Expired: the active signing link expired before completion.
- Cancelled: the sender voided or cancelled the signing request.
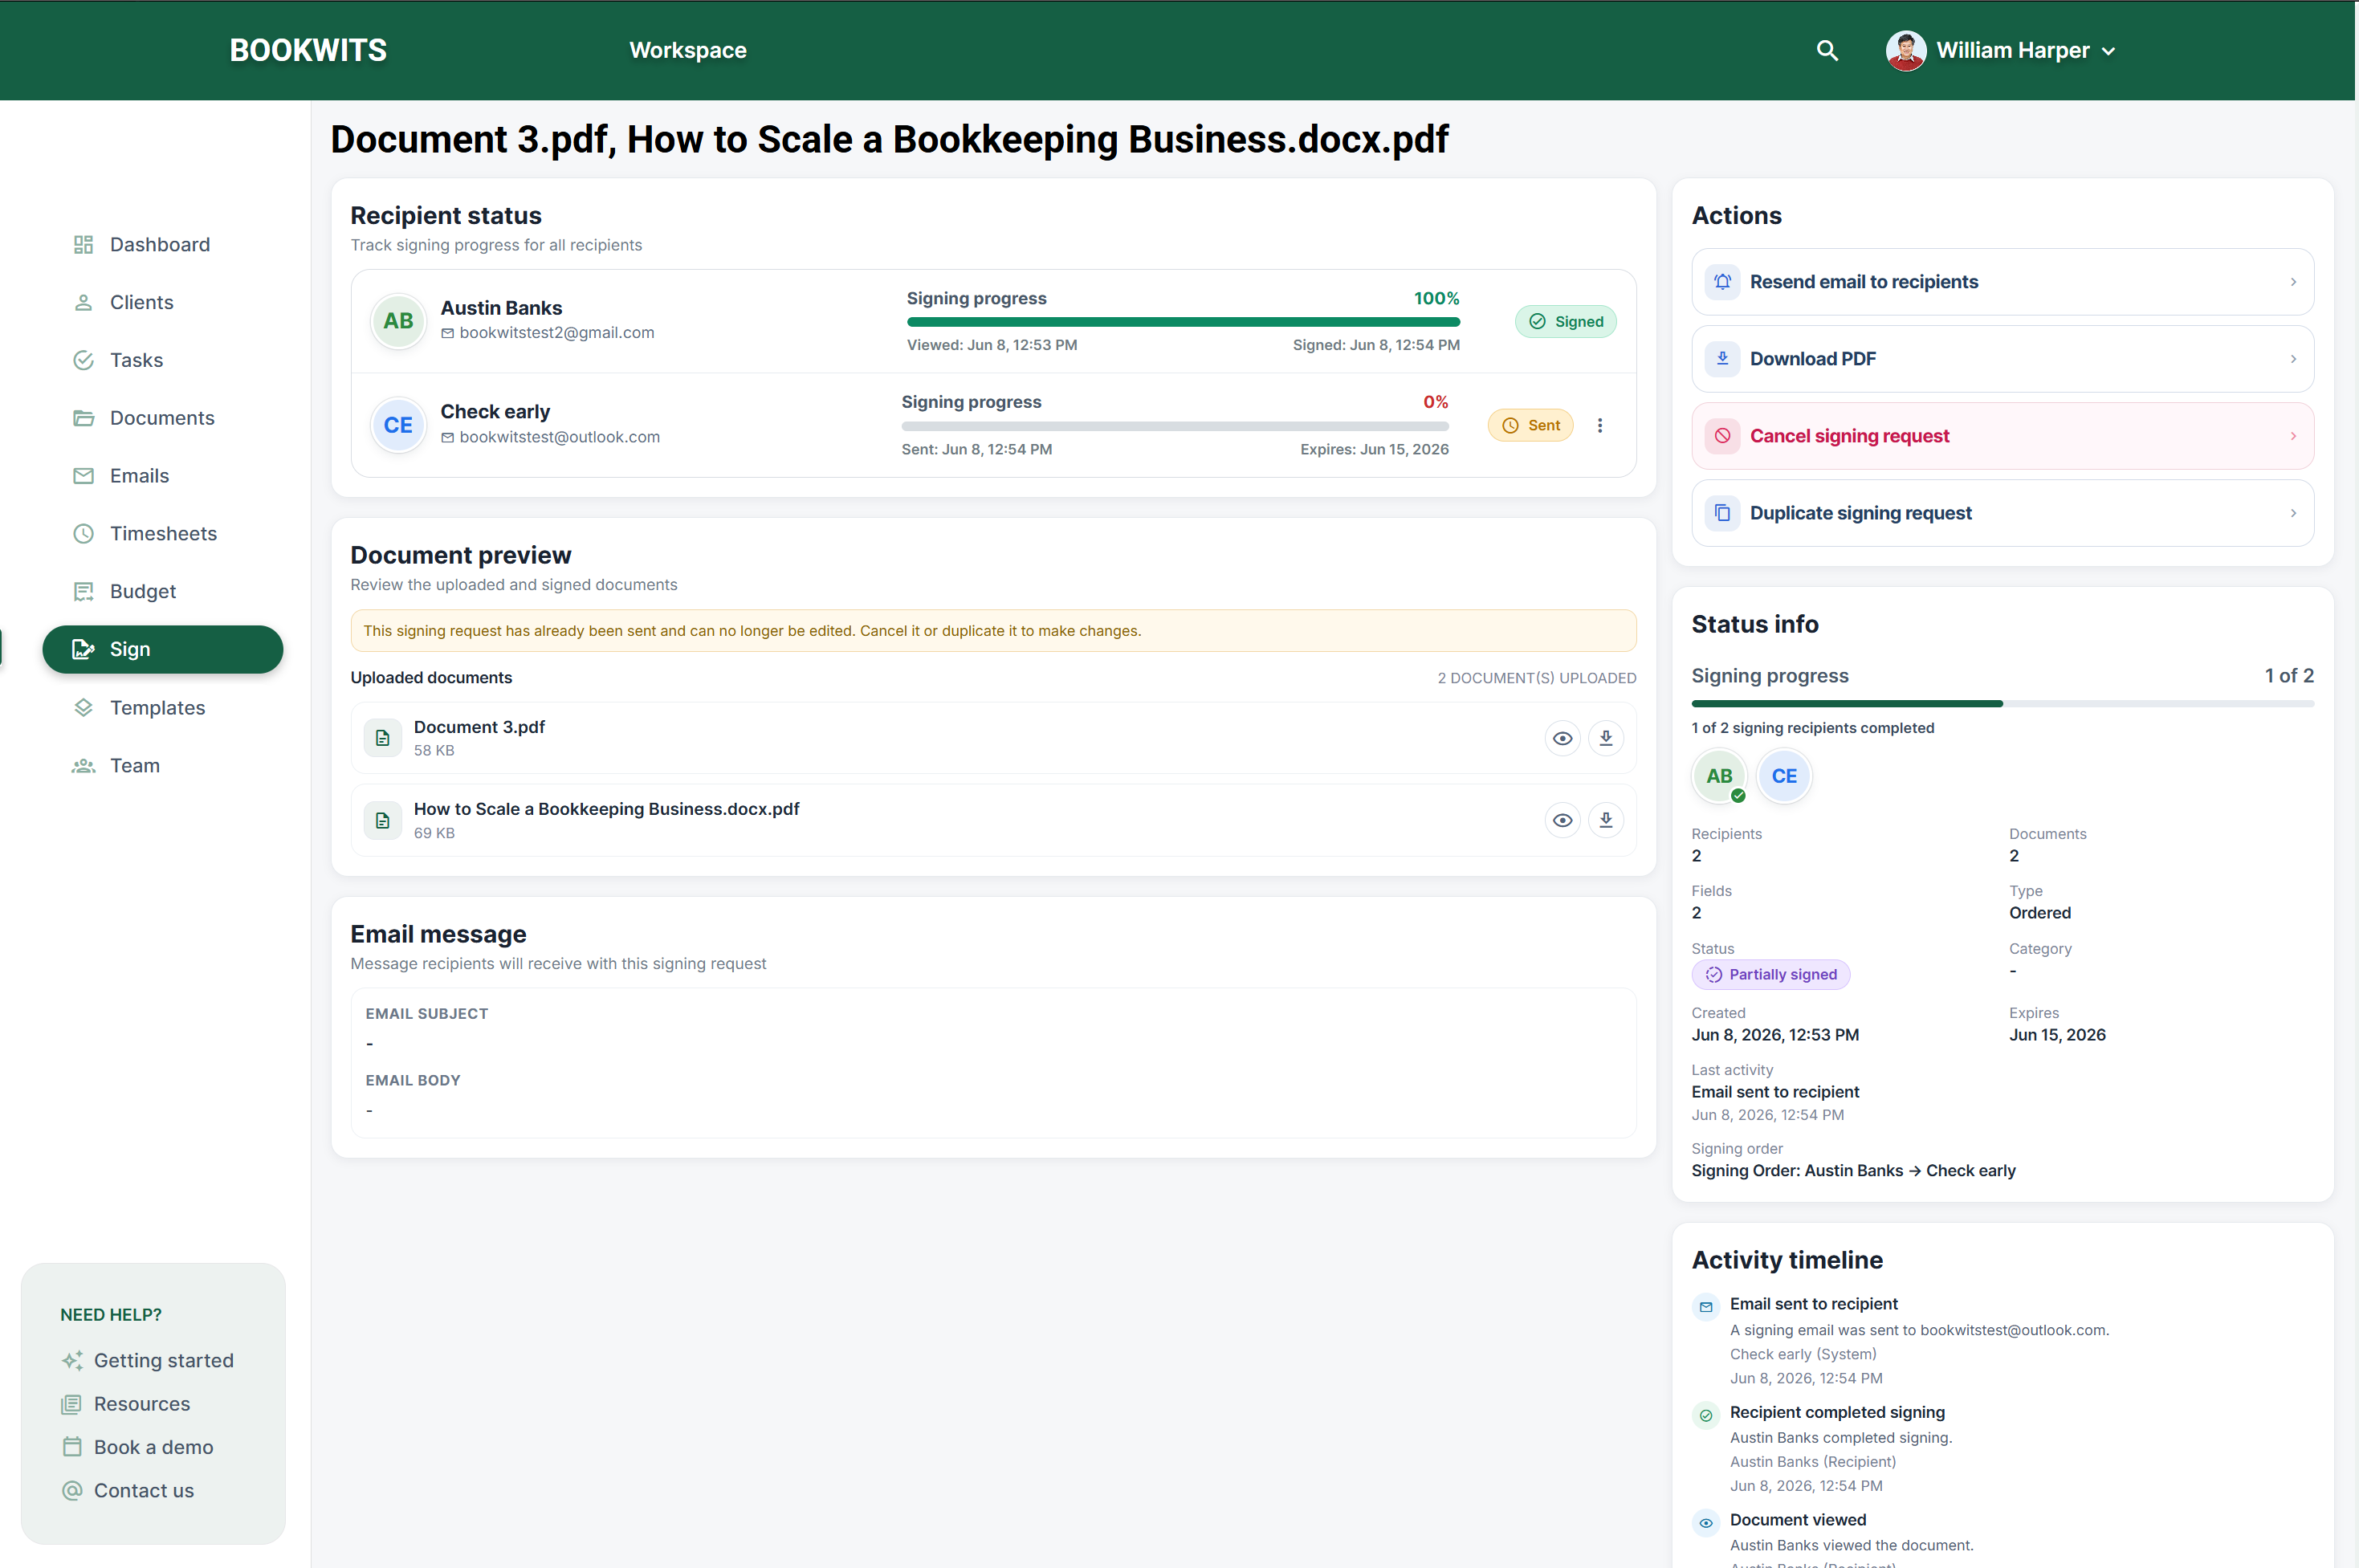
Use resend when a recipient cannot find the original email, their link needs to be refreshed, or you want to send the request again to a pending signer.
Use reminders when a pending signer has not completed the request. Reminders should only go to recipients who still need to act.
- Signed recipients are skipped.
- Recipients who only receive a copy are skipped.
- In ordered signing, only the current signing order is reminded or resent.
- Cancelled, declined, completed, and expired requests should be handled carefully because they are no longer normal active signing flows.
Once all required signers complete the request, Bookwits Sign generates the completed signed PDF and a completion certificate. The completed PDF shows the final document with signature fields applied. The certificate records the key signing details and audit trail.
- Signing request ID and certificate ID
- Status, subject, document count, page count, and signing type
- Sender name and email
- Signer names, recipient types, signing order, and status
- Sent, viewed, signed, declined, and completed timestamps where available
- IP address and user agent where captured
- Original document and signed document SHA-256 hashes for integrity tracking
- Open the completed signing request.
- Review the completed signed documents.
- Download the signed PDF if needed.
- Download the completion certificate if needed for your records.
A recipient can decline when they do not want to sign. The signing request is marked declined and the sender can review the decline reason.
Use void/cancel when the sender wants to stop a request that should no longer be signed, such as when the wrong document was sent.
A request can expire when the signing link is no longer valid. If the request still needs to be signed, create a new version or use the appropriate resend or reopen workflow supported in your setup.
Archive old requests to keep the main list clean without deleting useful signing history.
Duplicate a completed, declined, expired, or cancelled request when you need a new editable version using similar documents, recipients, or fields.
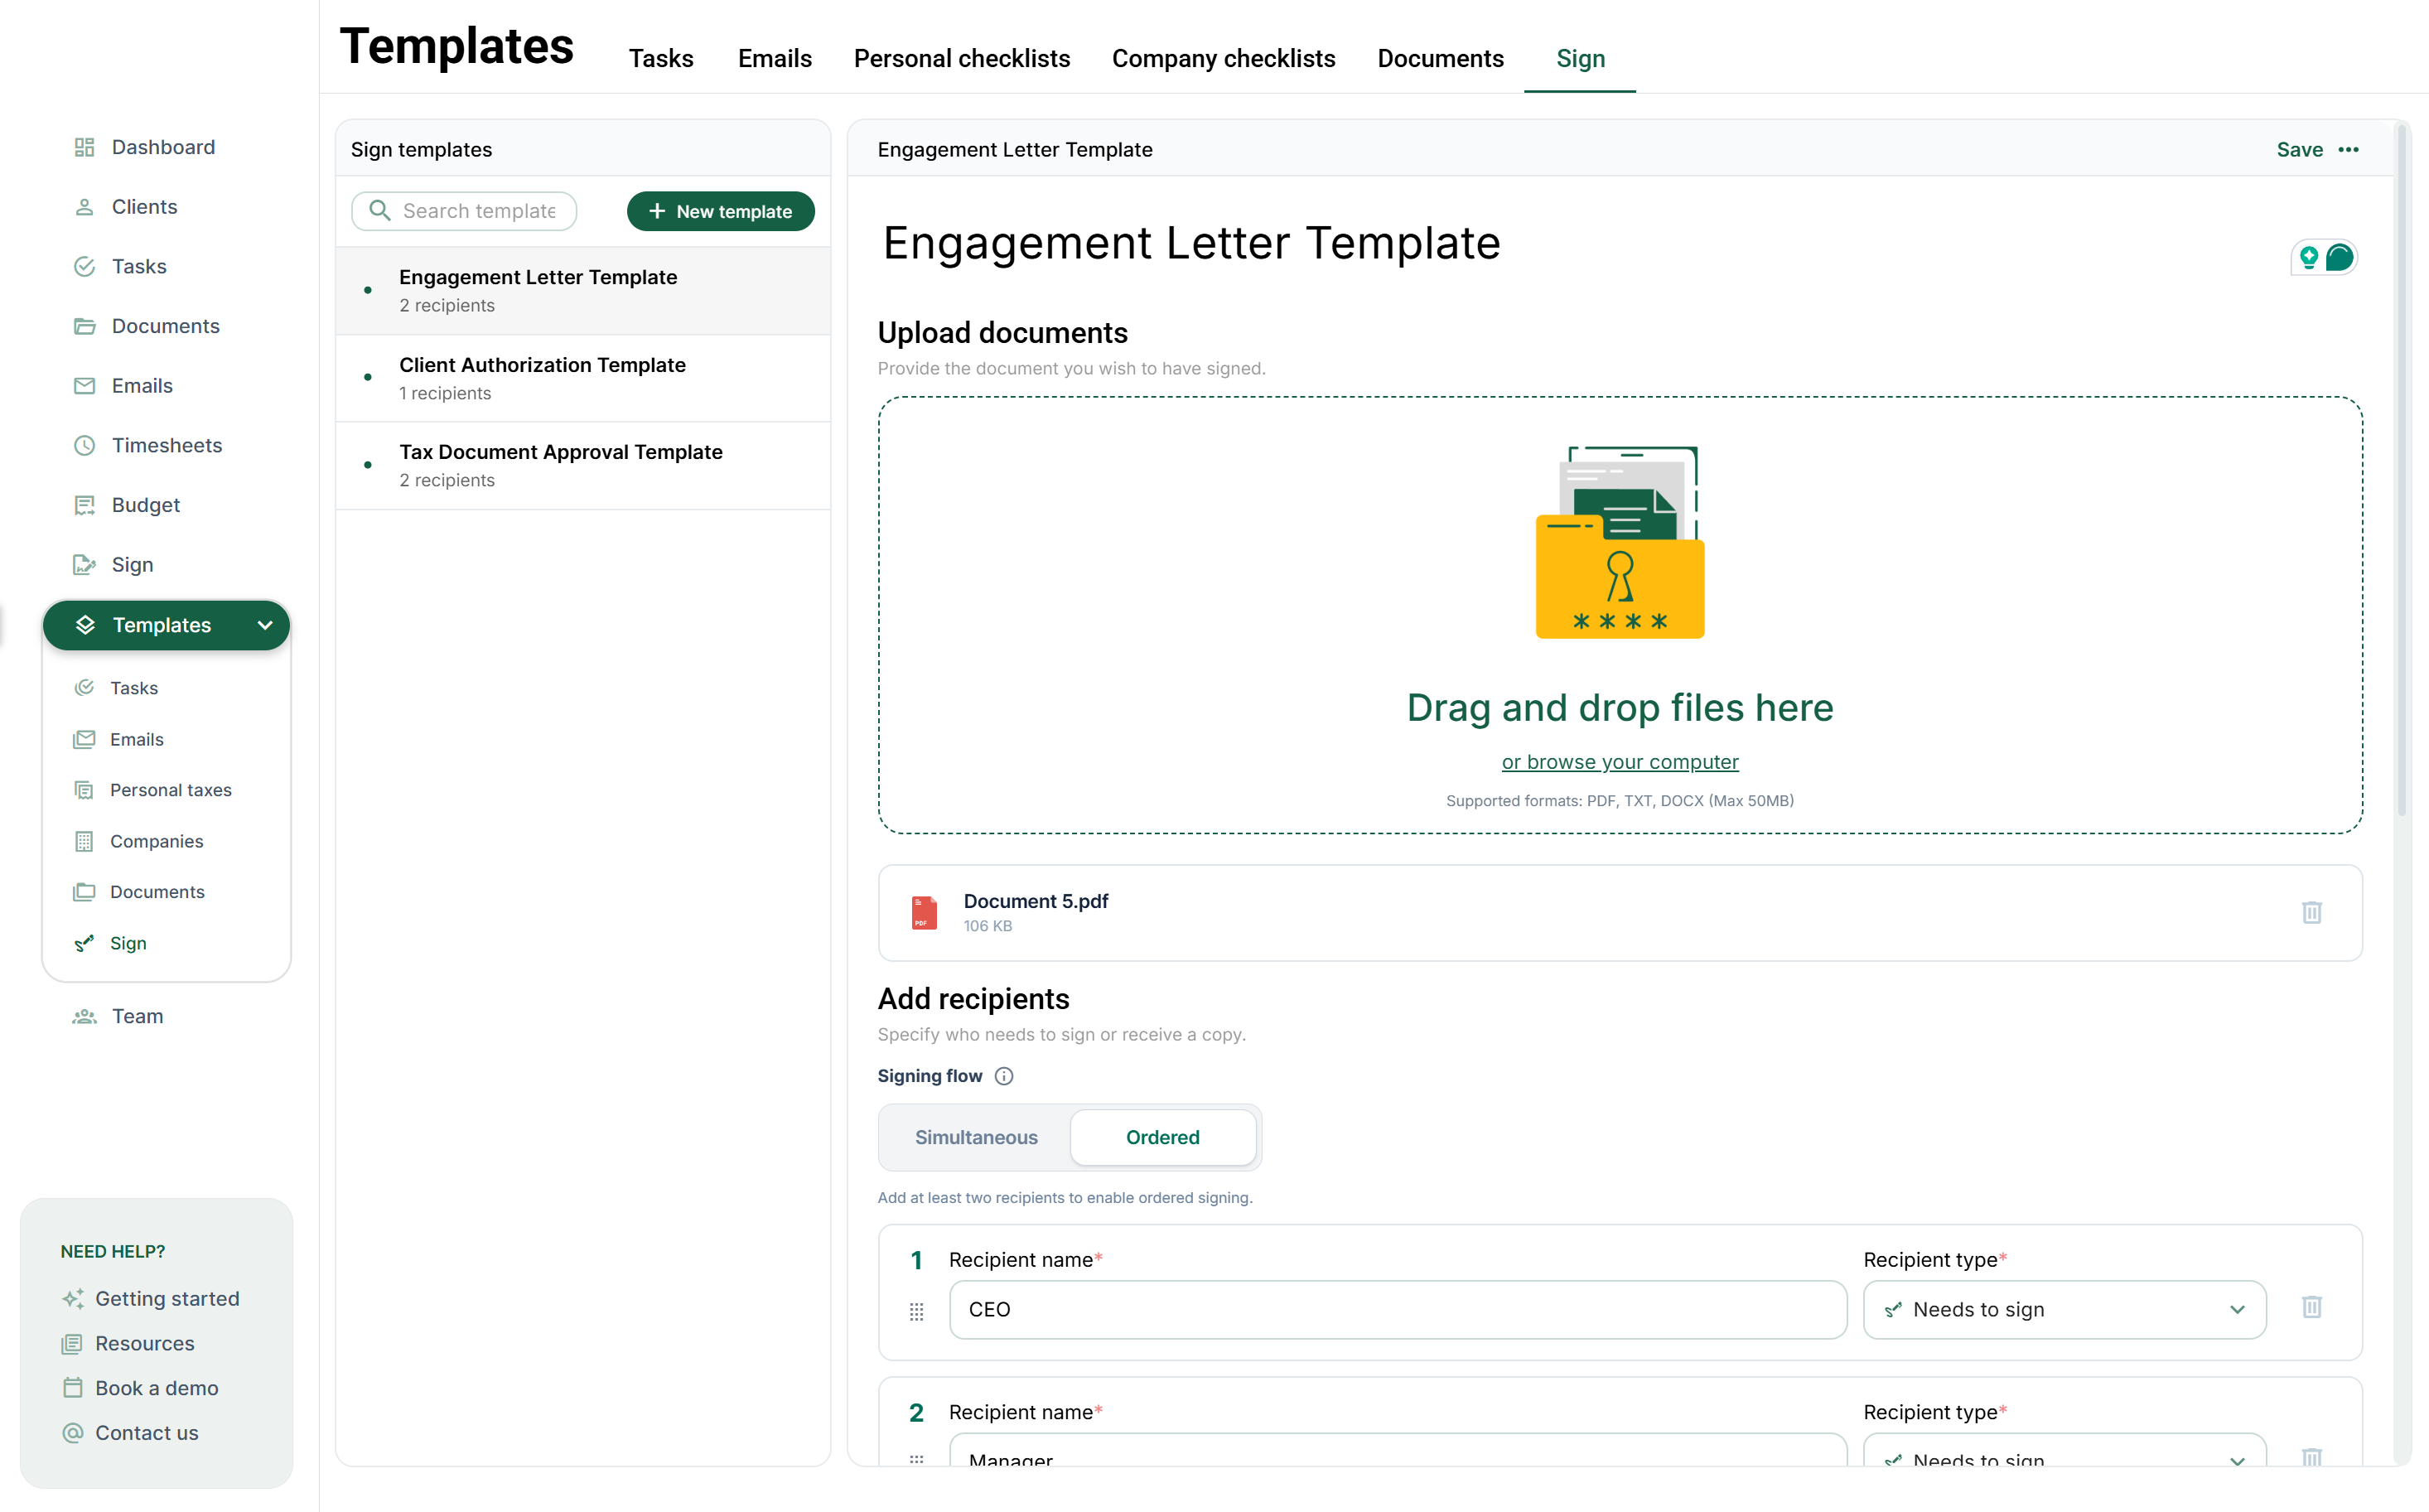
Use templates for documents you send repeatedly, such as engagement letters, authorization forms, bookkeeping agreements, onboarding forms, annual consent forms, and internal approval documents.
A template is a reusable setup. It can store the document structure, field placement, signing roles, signing order, category, and default email message. When you use a template, you create a new signing request from it and then add the real recipient names and email addresses.
Templates do not always need real names or emails. Instead, use roles such as Client, Spouse, Director, Officer, Internal Reviewer, or Copy Recipient. When creating a live signing request from the template, replace those roles with the actual people.
- Go to Sign Templates.
- Create a new template.
- Upload the reusable document.
- Add role-based recipients instead of real people if the template is generic.
- Place signature, initials, date, text, and checkbox fields.
- Save the template.
- When needed, create a signing request from the template and fill in the real recipients.
Use categories and filters when your firm sends many requests and needs to quickly find engagement letters, authorizations, consent forms, tax documents, payroll documents, corporate documents, or internal documents.
- Drafts: requests still being prepared.
- Awaiting: requests waiting on recipients.
- Completed: finished requests with signed documents.
- Archived: older requests hidden from the active list.
- Category filters: document type, workflow, or department grouping.
Security and audit trail
Each signer receives a recipient-specific signing link. The link should not be forwarded. If a recipient cannot find the email, use resend instead of asking them to share someone else’s link.
Each recipient has their own signing status and access flow. This helps track who has been sent the request, who viewed it, who completed it, and who still needs to act.
Bookwits records important signing events such as request creation, email sent, document viewed, field completed, signature applied, recipient declined, request completed, signed document generated, and completion certificate generated.
Original and completed documents can be tracked with SHA-256 hashes. A hash is a digital fingerprint of the file; if the file changes, the hash changes. This helps show whether the stored document is the same file that was recorded at signing time.
After completion, the signed PDF and completion certificate should be treated as business records. They help your firm answer questions later, such as “Which document was signed?”, “Who signed it?”, “When did they sign?”, and “What was the signing sequence?”.
- Confirm recipient email addresses before sending.
- Do not ask clients to forward signing links.
- Use resend for a specific pending recipient when needed.
- Void or cancel a request if the wrong document was sent.
- Archive completed requests instead of deleting business records.
- Use templates to reduce field-placement mistakes in repeat workflows.
Beginner workflows (copy/paste)
- Create a signing request named “2026 Engagement Letter – Client Name”.
- Upload the engagement letter PDF.
- Add the client as “Needs to sign”.
- Place signature, full name, title, company name, and date signed fields.
- Send the request and track it under Awaiting.
- After completion, download the signed PDF and certificate if needed.
- Create a signing request and choose ordered signing.
- Add Director 1 with order 1 and Director 2 with order 2.
- Assign each director their own signature/date fields.
- Send the request.
- Director 2 receives the signing flow after Director 1 completes.
- Create a Sign Template named “Annual Client Authorization”.
- Use role-based recipients such as Client and Spouse.
- Place signature, initials, date signed, and checkbox acknowledgement fields.
- Save the template.
- Each year, create a new signing request from the template and fill in the real recipient details.
Troubleshooting (Common Beginner Issues)
- Confirm at least one document has been uploaded.
- Confirm every signer has a name and email address.
- Confirm every “Needs to sign” recipient has at least one required field.
- Confirm required fields are assigned to the correct recipient.
- Void or cancel the request if the wrong document or recipient was used.
- Duplicate the request or create a new draft with the correct recipient.
- Do not ask recipients to forward signing links.
- Check the signing request activity.
- Confirm the email address is correct.
- Use resend for that pending recipient.
- Ask them to check spam/junk folders if needed.
- Return to the draft before sending and correct field placement.
- Use recipient colours to verify who owns each field.
- If the request was already sent, void/cancel and create a corrected version.
- Completed requests should not be edited.
- Duplicate the request to create a new editable version.
- Send the corrected version as a new signing request.