Back to Resources
Video Walkthrough (Timesheets Module)
If you have a walkthrough video, drop it here. It’s most helpful to show:
tracking from tasks, status workflow, and “Mark Invoiced + Generate report”.
 Coming soon...
HOW TO USE BOOKWITS
TIMESHEETS
BEGINNER
Timesheets Module Guide
Timesheets helps you track work time, attach it to the right Client / Company / Personal Tax Year, move entries through a simple review → approval → invoicing workflow, and export billing reports (CSV/XLS).
How to Use Bookwits
9 min read
What a timesheet entry is (plain English)
A timesheet entry is one record of work that answers:
- Who did the work? (Created by)
- What did they do? (Note)
- Who was it for? (Client + optional Company/Personal Tax Year)
- When was it done? (Date + Time in/out)
- How long did it take? (Duration)
- Where is it in the workflow? (Status)
If you do two things consistently—pick the right Client
and write a clear Note—billing becomes painless.
Statuses (what each one means)
New
A saved entry that is not submitted yet.
Typical cases: you stopped a timer; you created a manual entry; you edited
an entry that still needs review.
In progress
The timer is currently running. This status is only active while tracking
time in real time.
Submitted
The entry was submitted by the user and is ready for review.
Pending approval
The entry is waiting for an Owner/Admin to review and approve.
Depending on your workflow, Submitted entries may show as Pending approval
for approvers.
Invoiced
The entry has been billed/exported and is treated as finalized for
invoicing.
The beginner workflow (most intuitive order)
1
Track time
while you work (timer)
2
Add/fix entries
manual time when needed
3
Review
with Group By + Filters
4
Submit
entries for approval
5
Approve
Owner/Admin review
6
Mark Invoiced + Generate report
(CSV/XLS)
Everything below follows that exact flow.
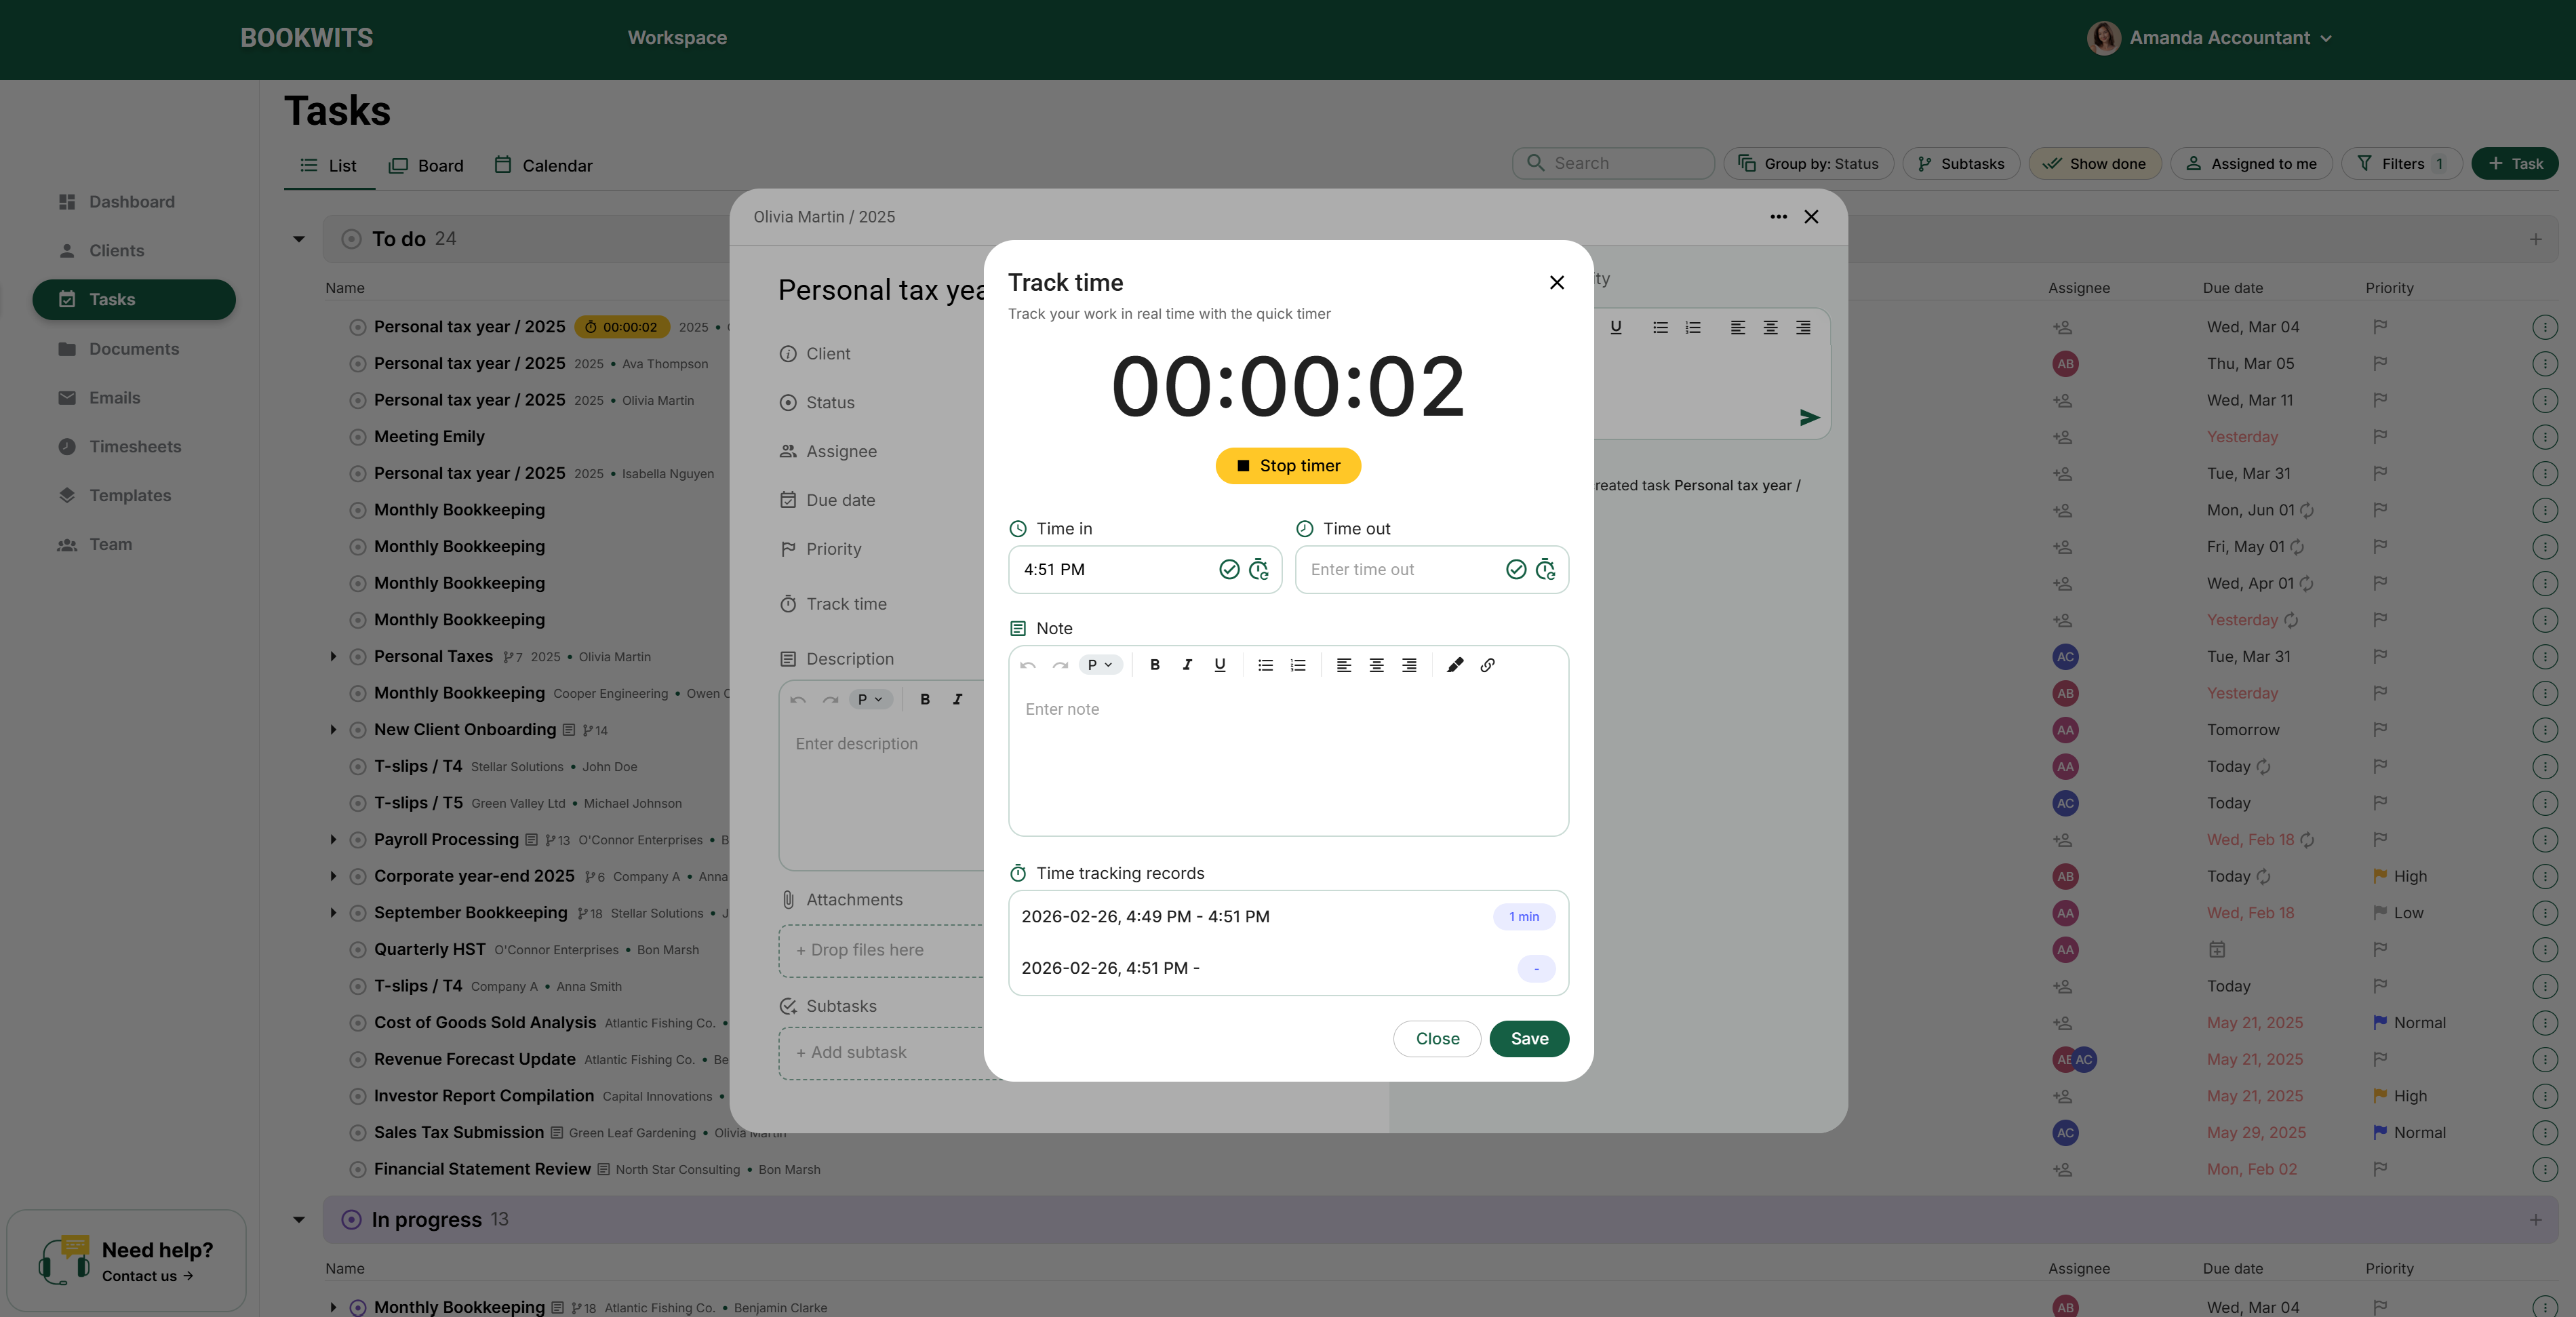
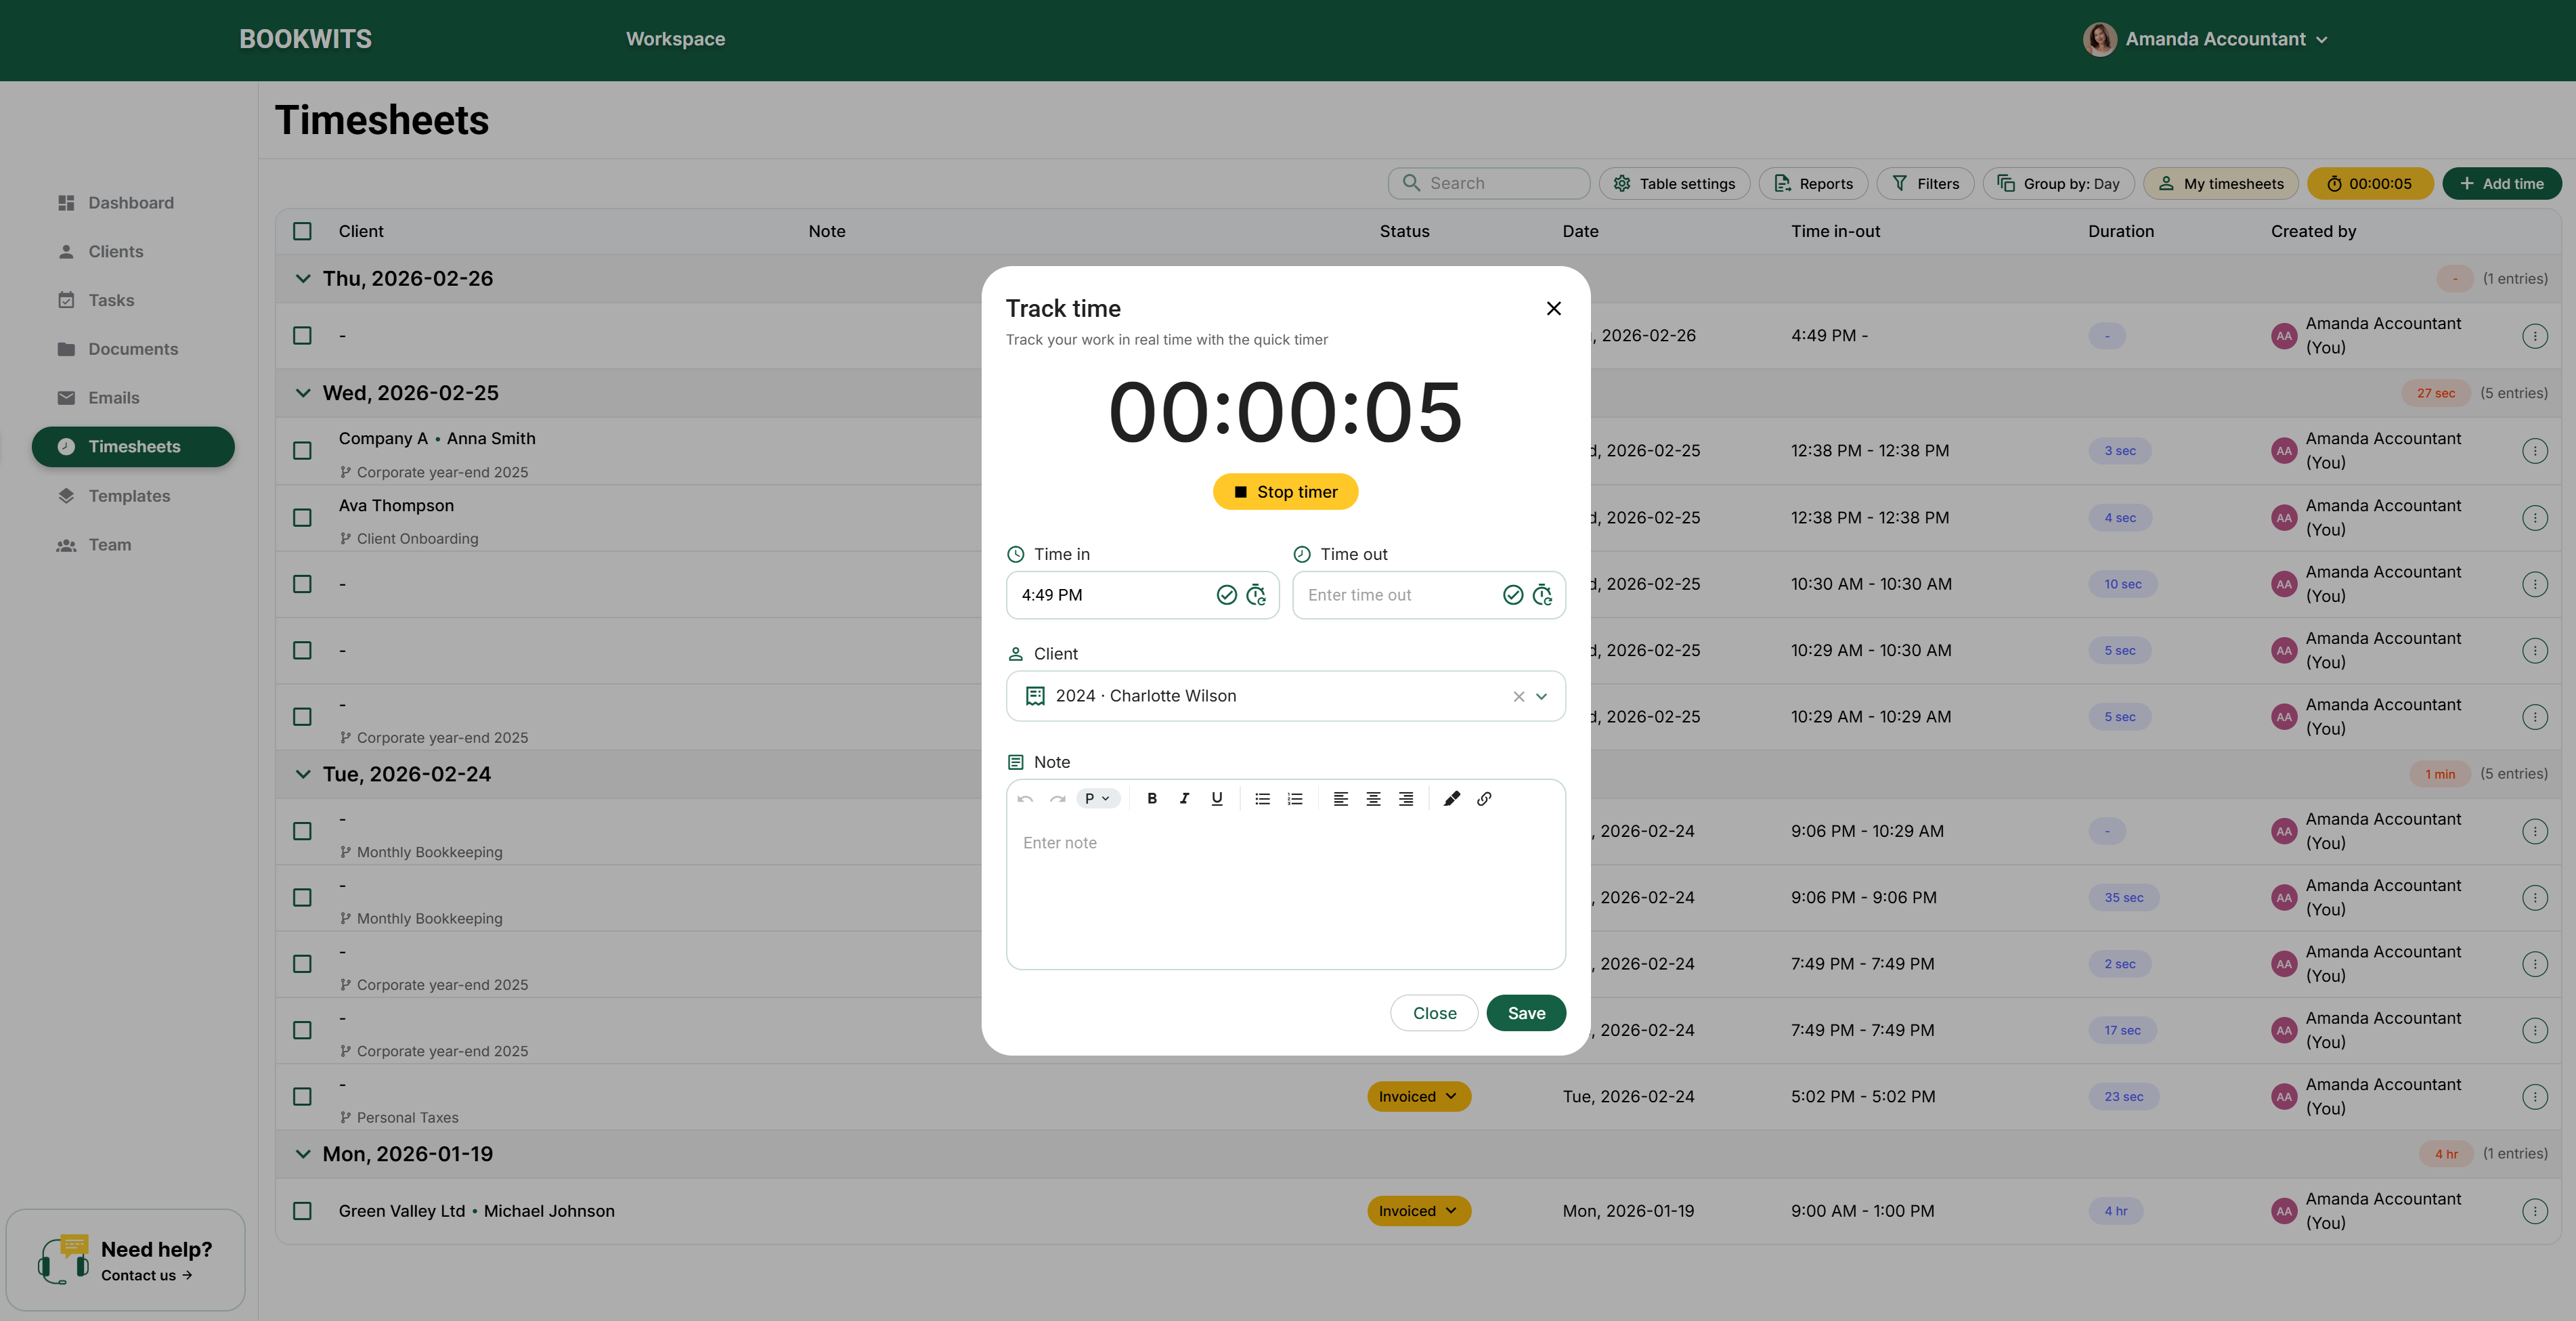
1) Track time (Timer)
Option A — Timesheets → Track Time (quick timer)
Option B — Start from a Task (best practice)
- Go to Timesheets.
- Click Track Time.
- Select Client (+ optional Company/Personal Tax Year).
- Add a Note (what you’re doing).
- Start timer → stop when finished.
Track Time screen fields
- Timer: 00:00:00
- Time in
- Time out
- Client
- Note
Option B — Start from a Task (best practice)
- Open the task you’re working on.
- Click Start timer.
- Do the work.
- Click Stop.
What happens
- While running: status is In progress
- When stopped: entry is created as New
- The entry inherits task context (Client + Company/Personal Tax Year if linked)
Why this is best: it automatically ties time to the correct work item,
so billing stays clean.
Always write a short note like “Client onboarding call”, “Corporate
year-end review”, “T1 slips”. It makes approvals and invoicing painless.
2) Add time manually (Create time sheet)
Use this when:
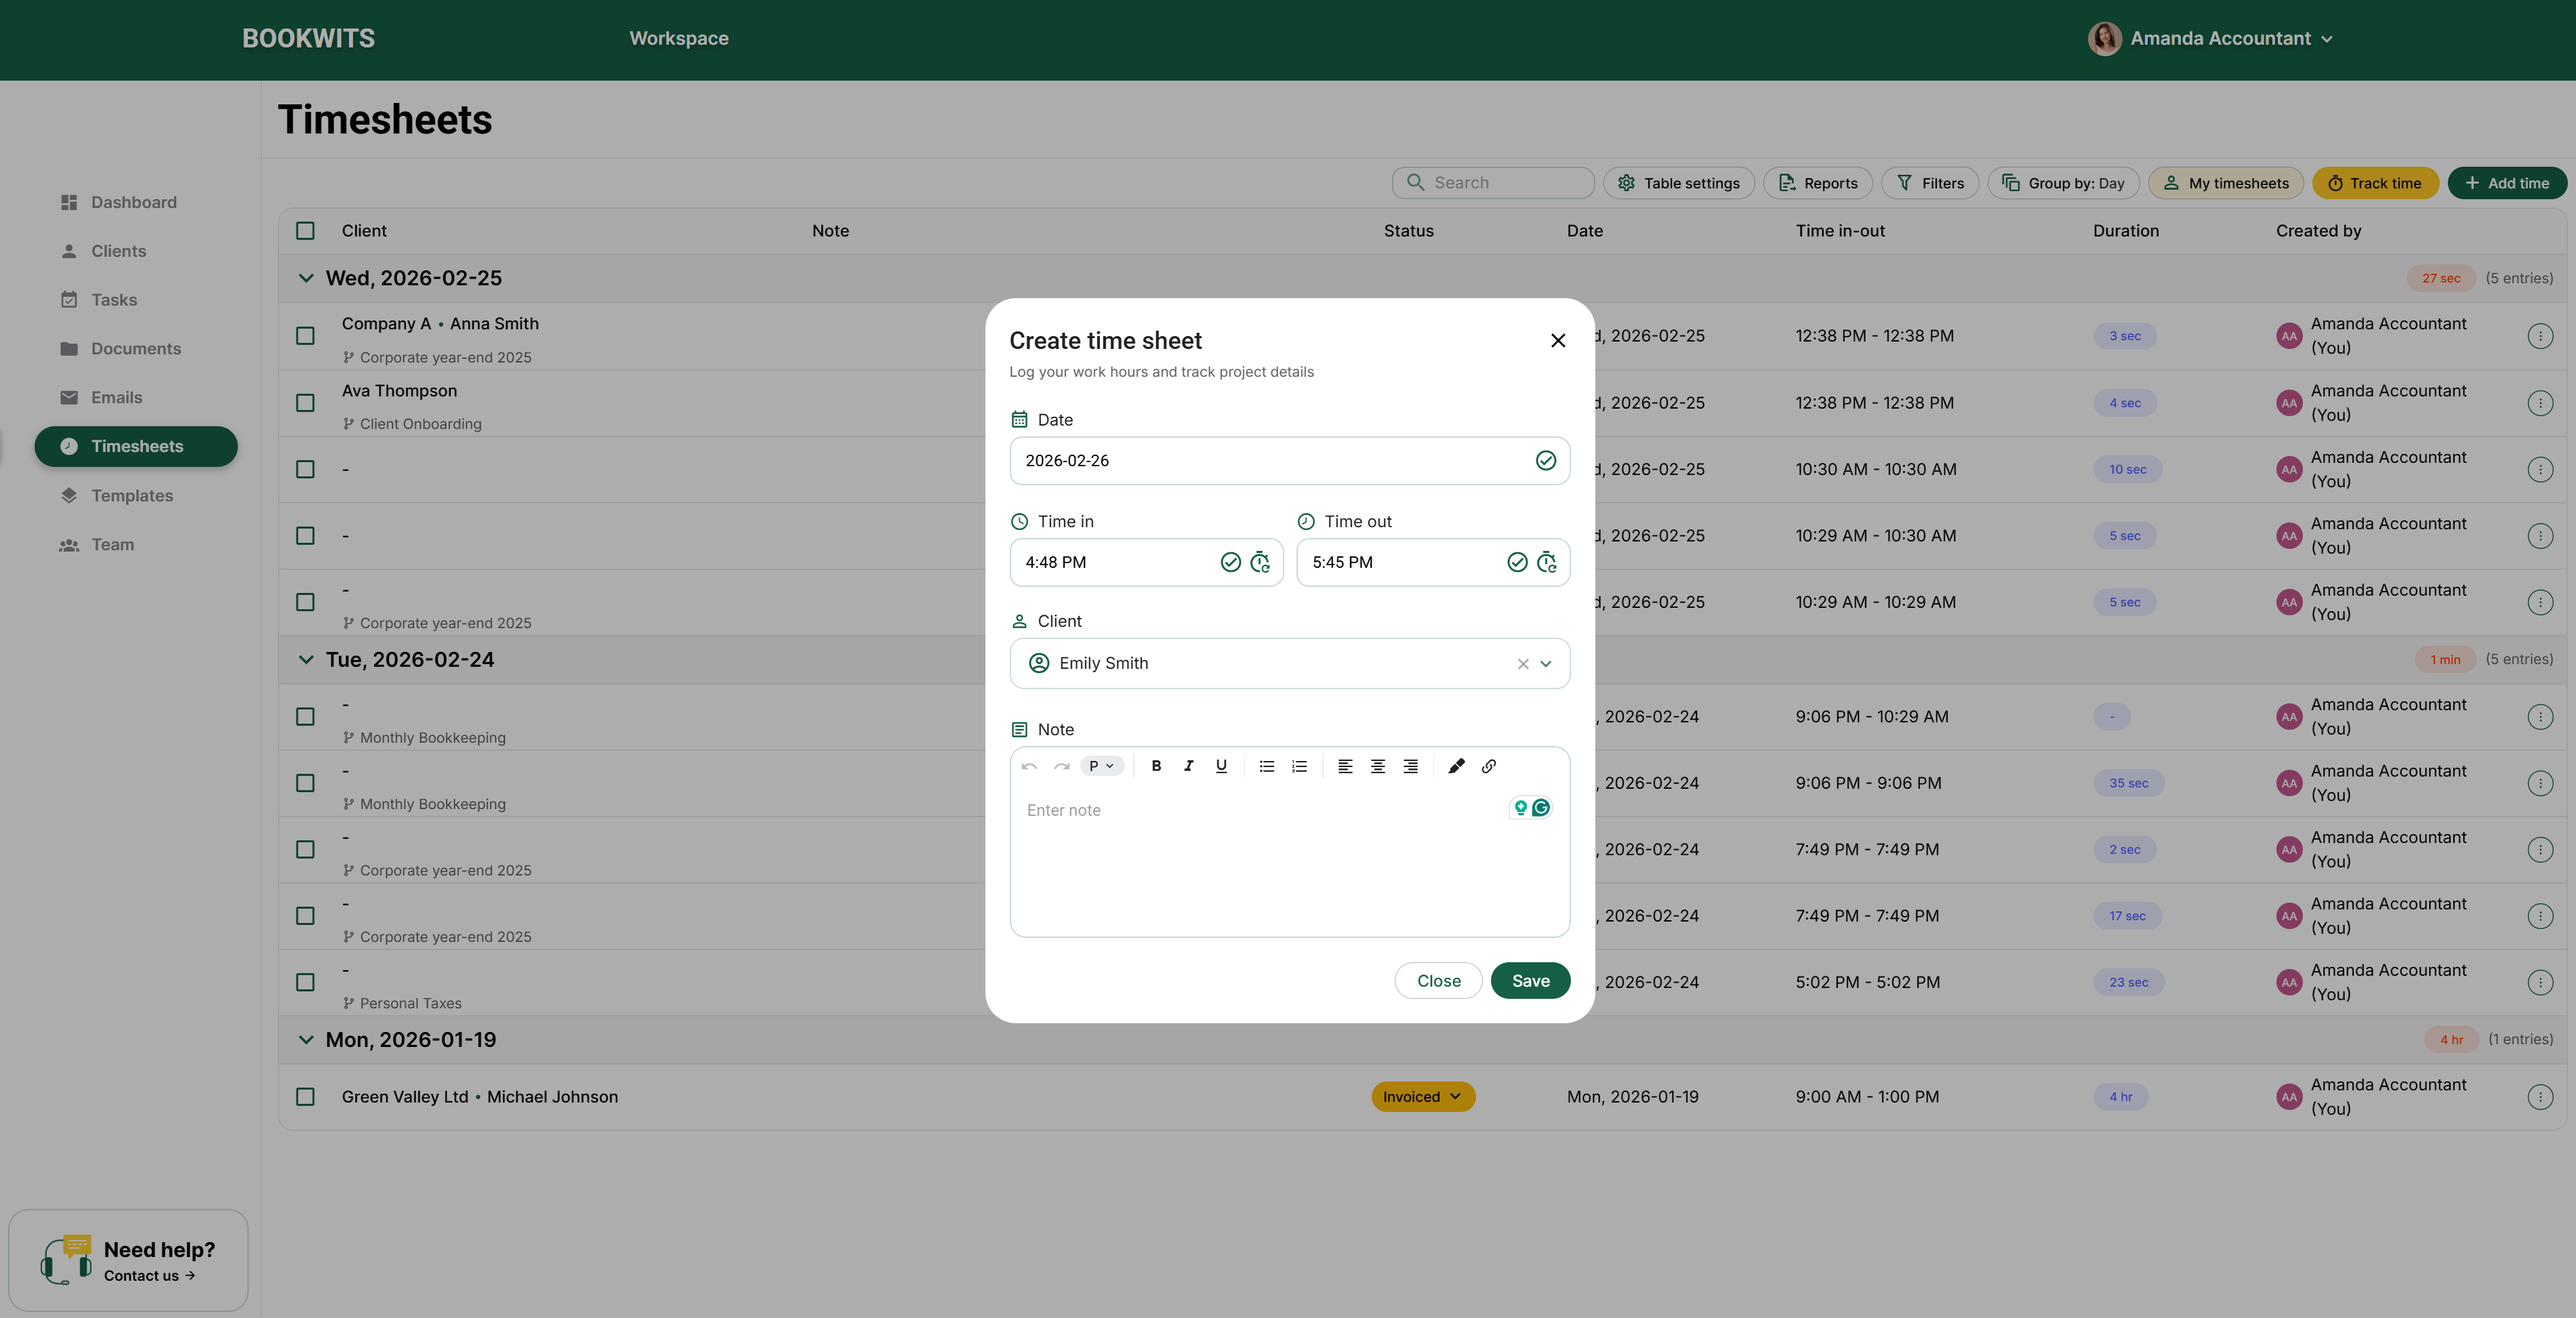
- You forgot to run the timer
- You’re logging time from yesterday
- You need a fixed block (meeting, travel, review)
Steps
- Go to Timesheets
- Click Add Time / Create time sheet
- Enter Date, Time in, Time out, Client, Note (+ optional Company/Tax Year)
- Save
Result
Entry is created as New.
3) Understand the Timesheets table
Your table includes columns like:
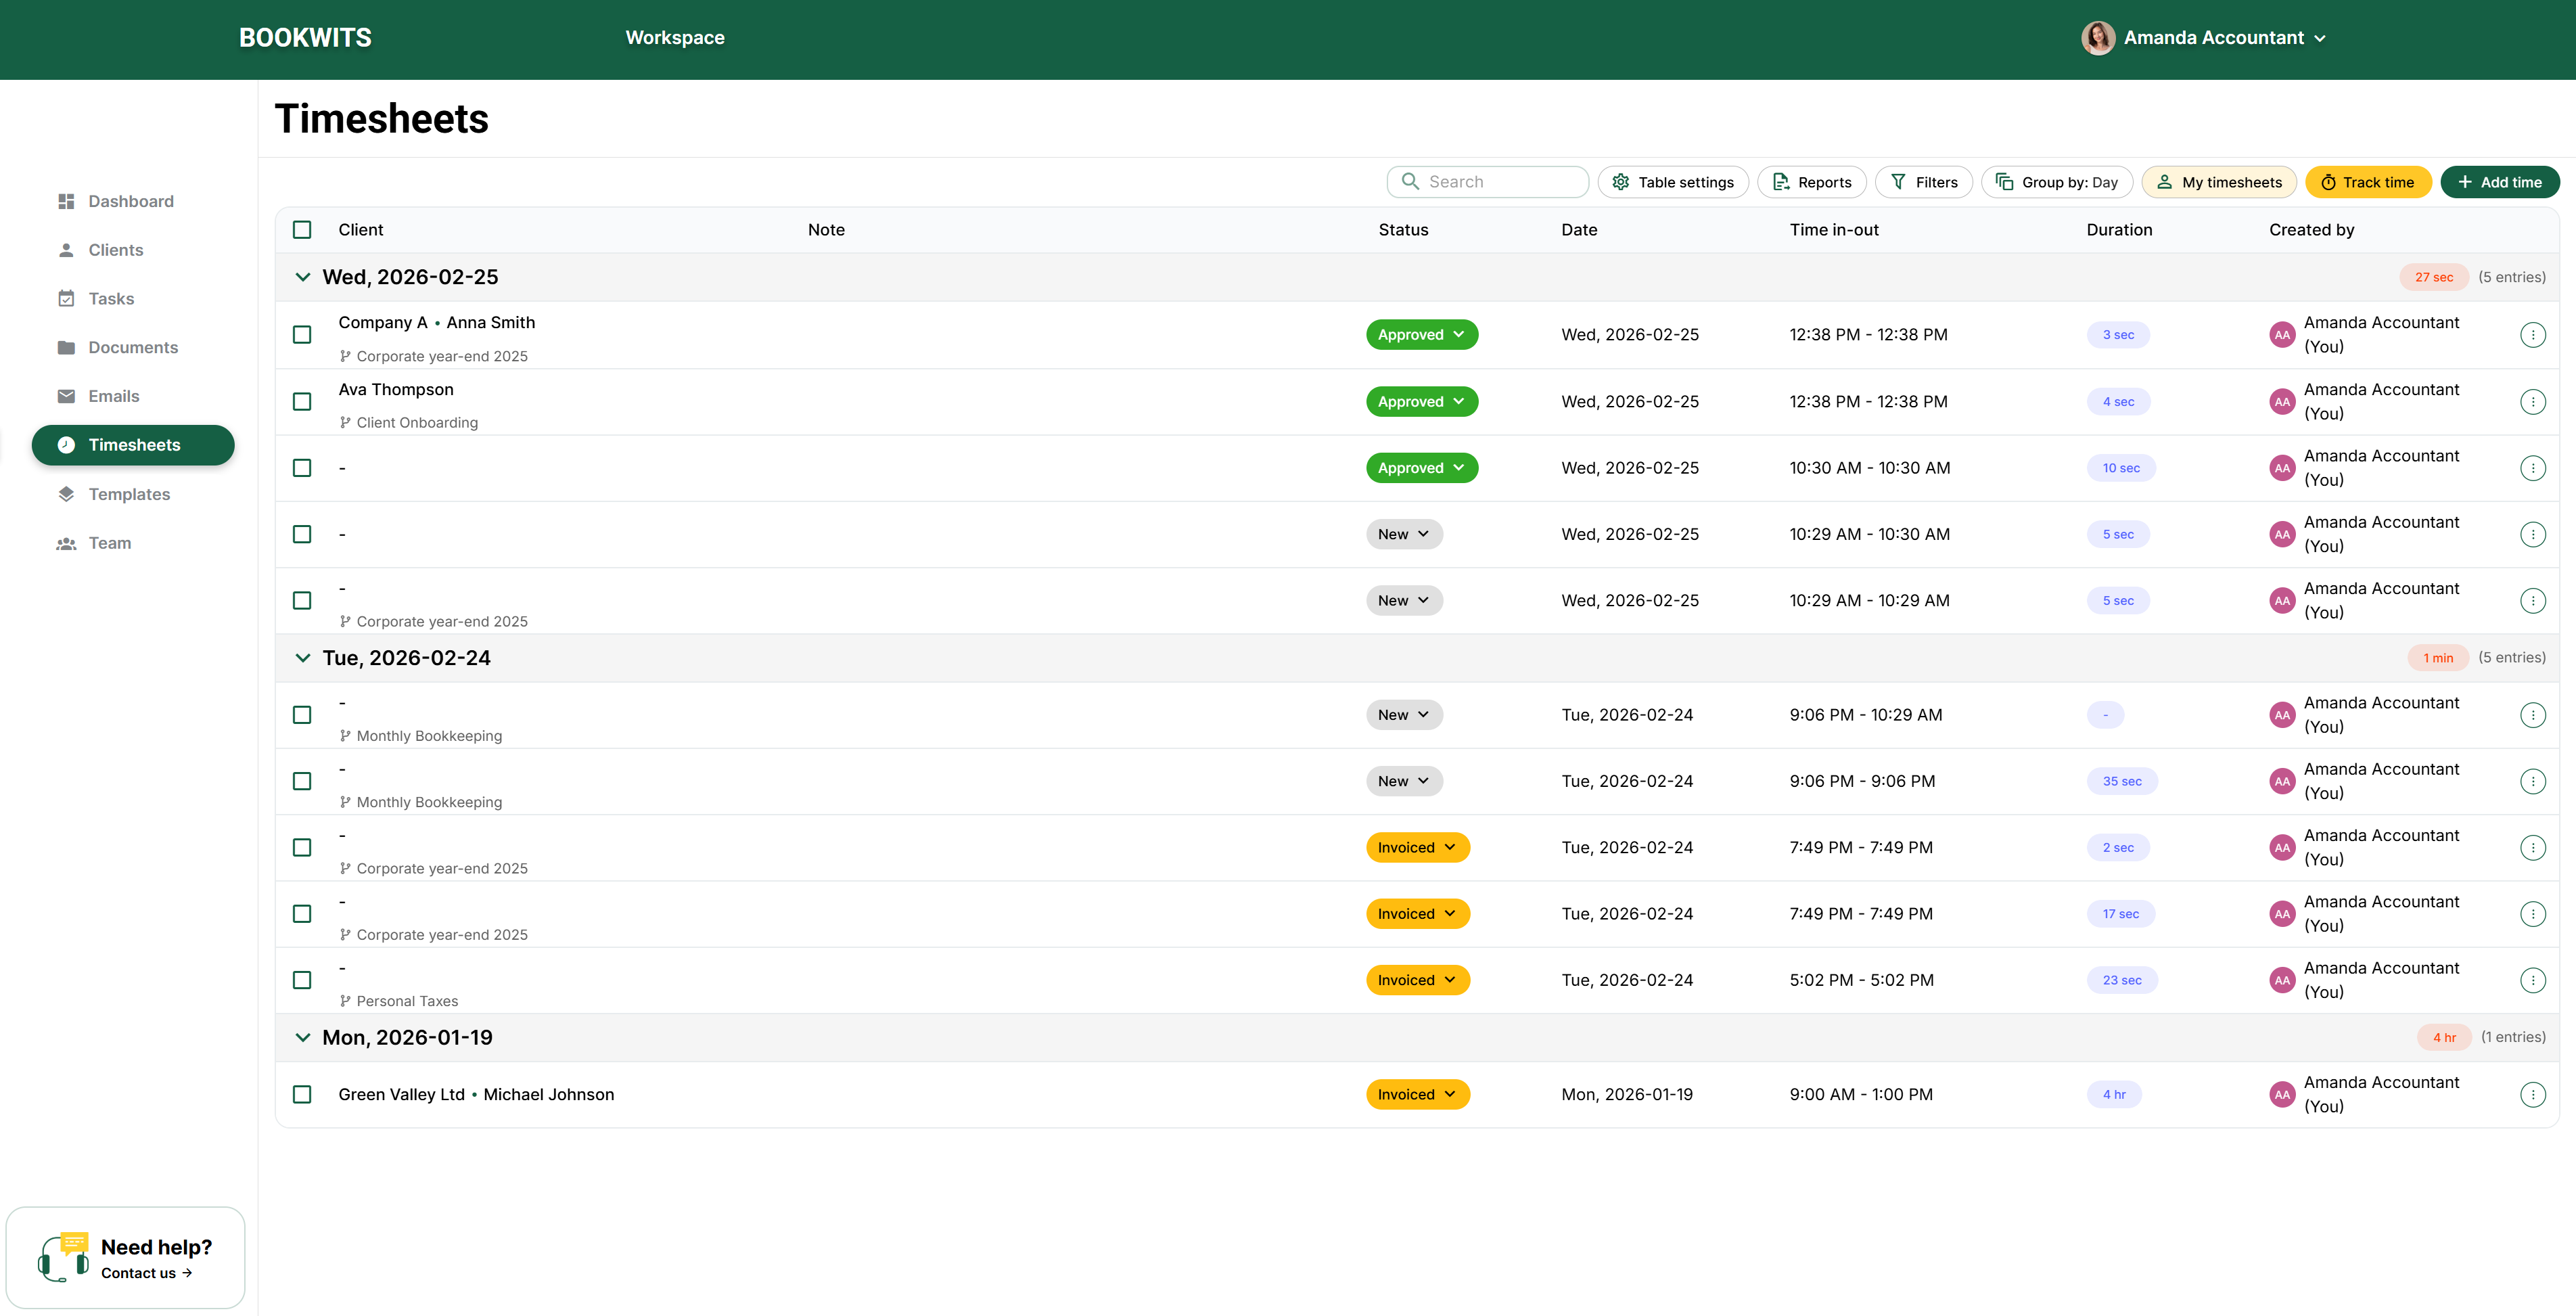
- Client — who the work is for
- Note — what was done
- Status — New / In progress / Submitted / Pending approval / Invoiced
- Date — day the work occurred
- Time in-out — start and end time range
- Duration — calculated time
- Created by — who logged it
Grouped totals (common)
You may see grouped totals like: “Wed, 2026-02-25 — 27 sec (5 entries)”
depending on grouping.
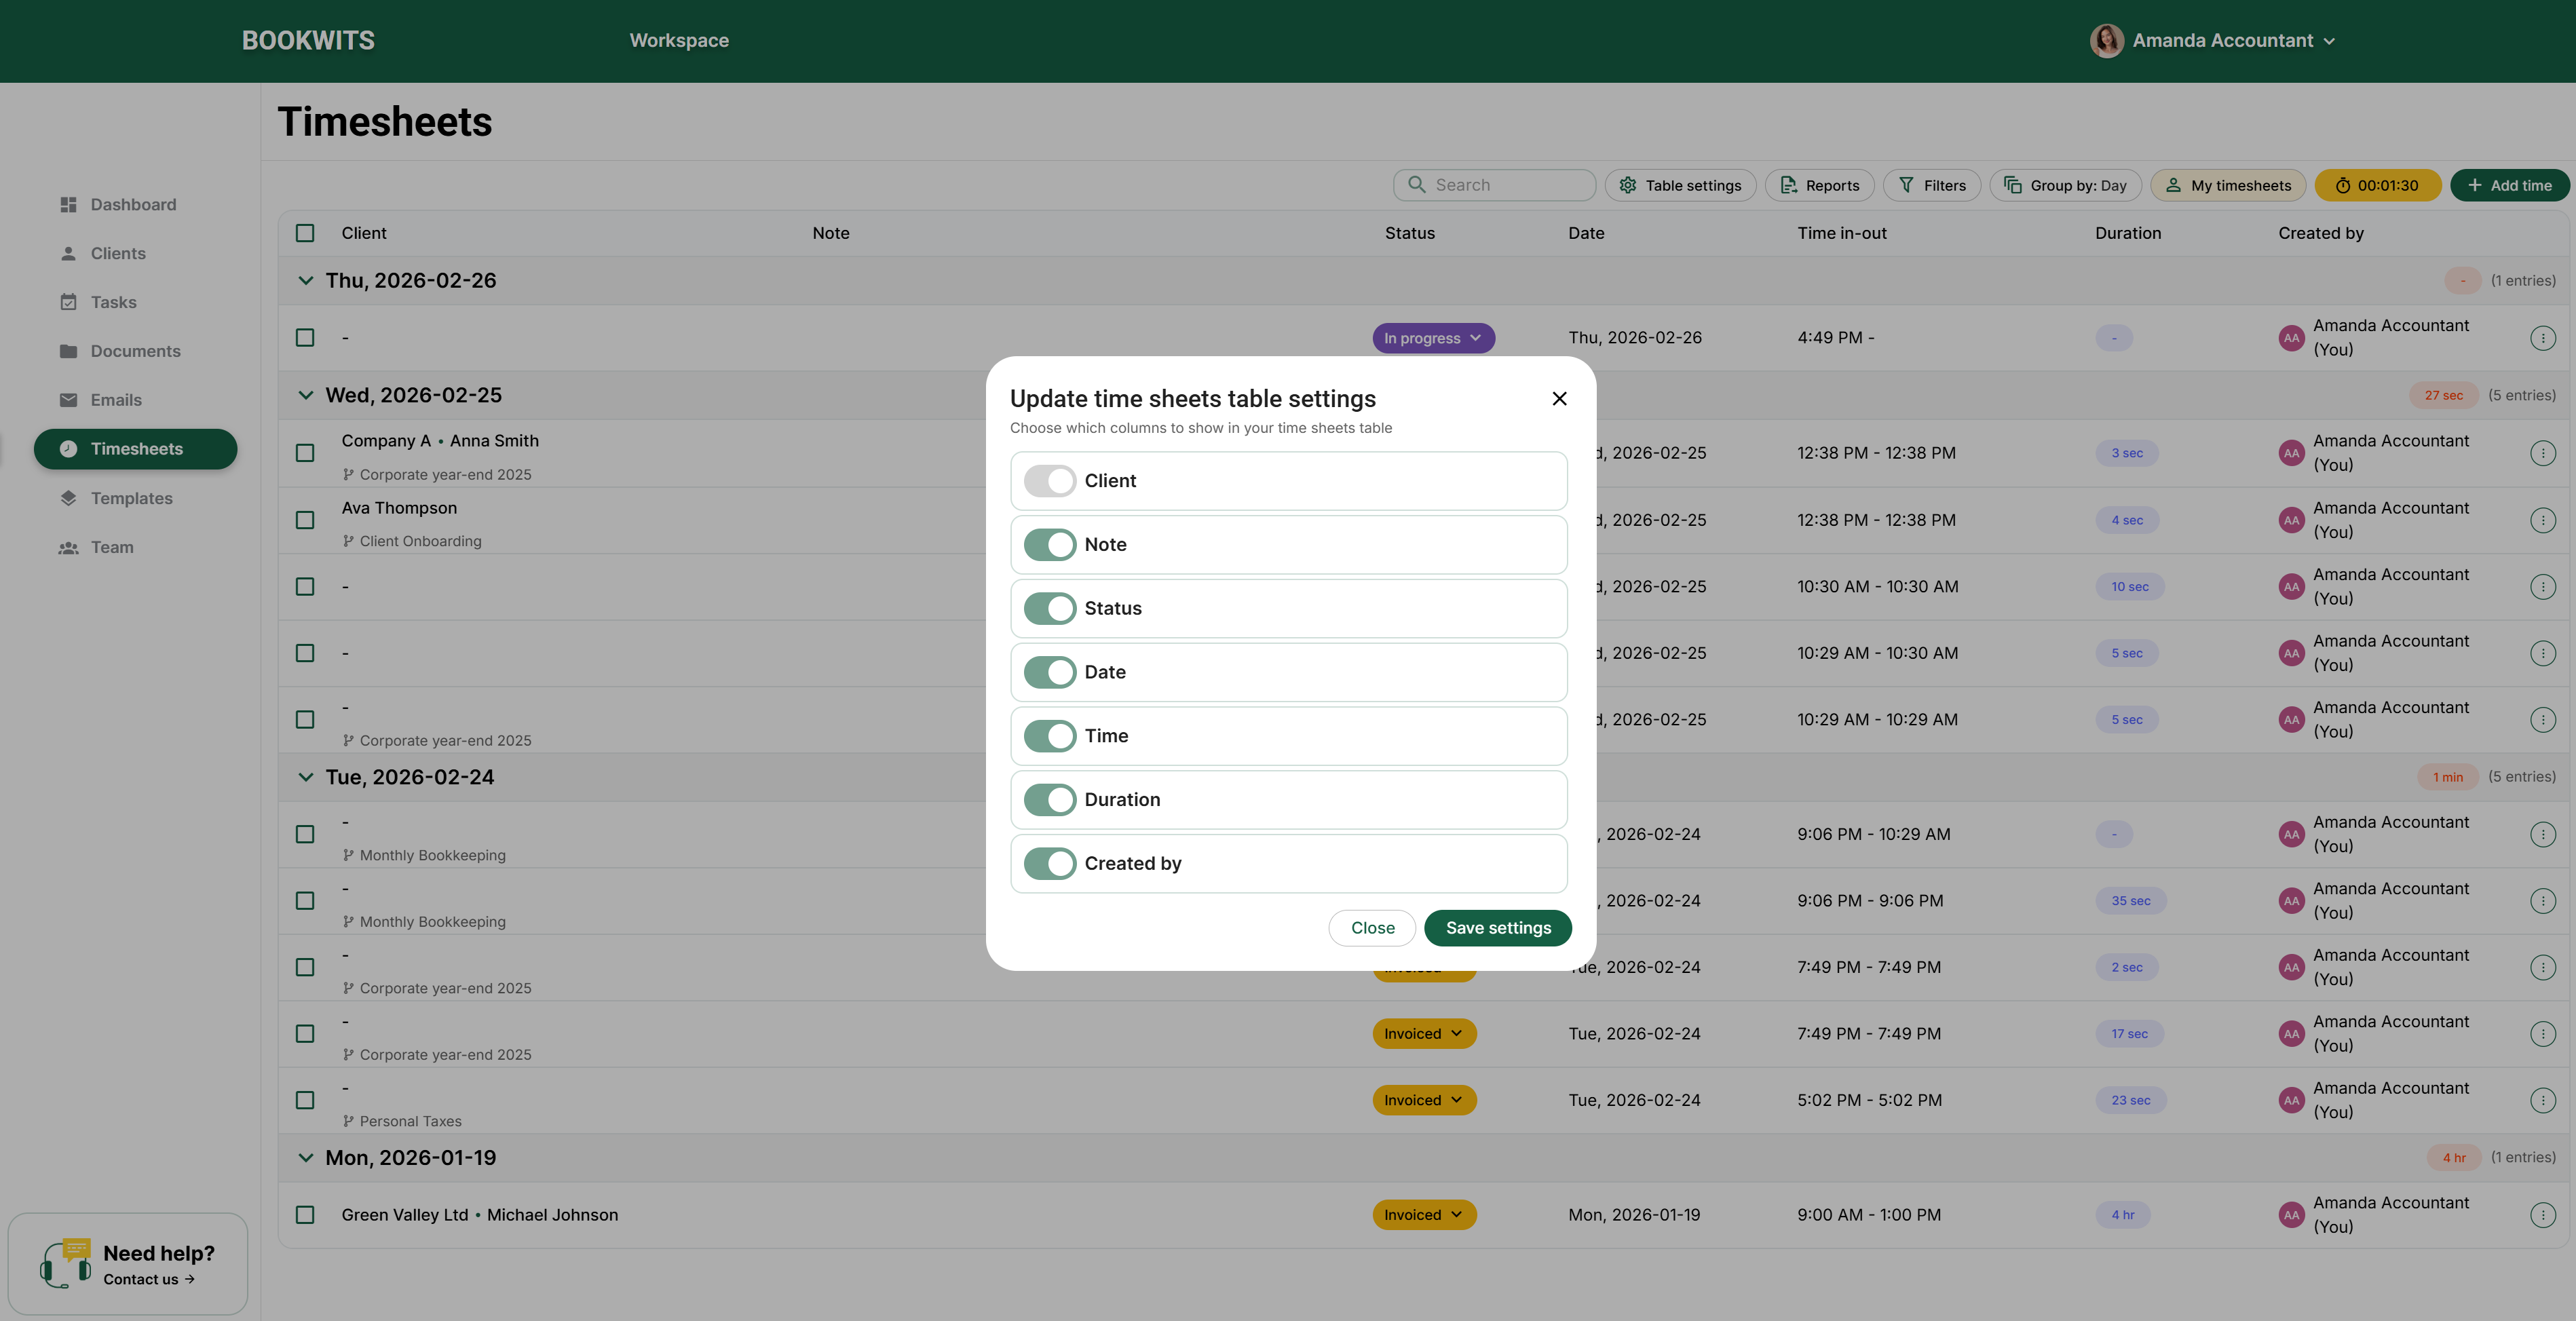
Configure visible columns
You can choose which columns are shown in the table (hide what you don’t
use).
For most teams, keep:
Client, Note, Status, Date, Duration, Created by.
4) Review entries faster (Group By + Filters)
Group By options
None
Status
Day
Week
Month
Year
Created by
Company
Personal tax year
Client
Most common views
- Group by Created by → managers checking team time
- Group by Client / Company / Personal tax year → billing + file review
- Group by Week / Month → internal reporting / payroll
Filters available
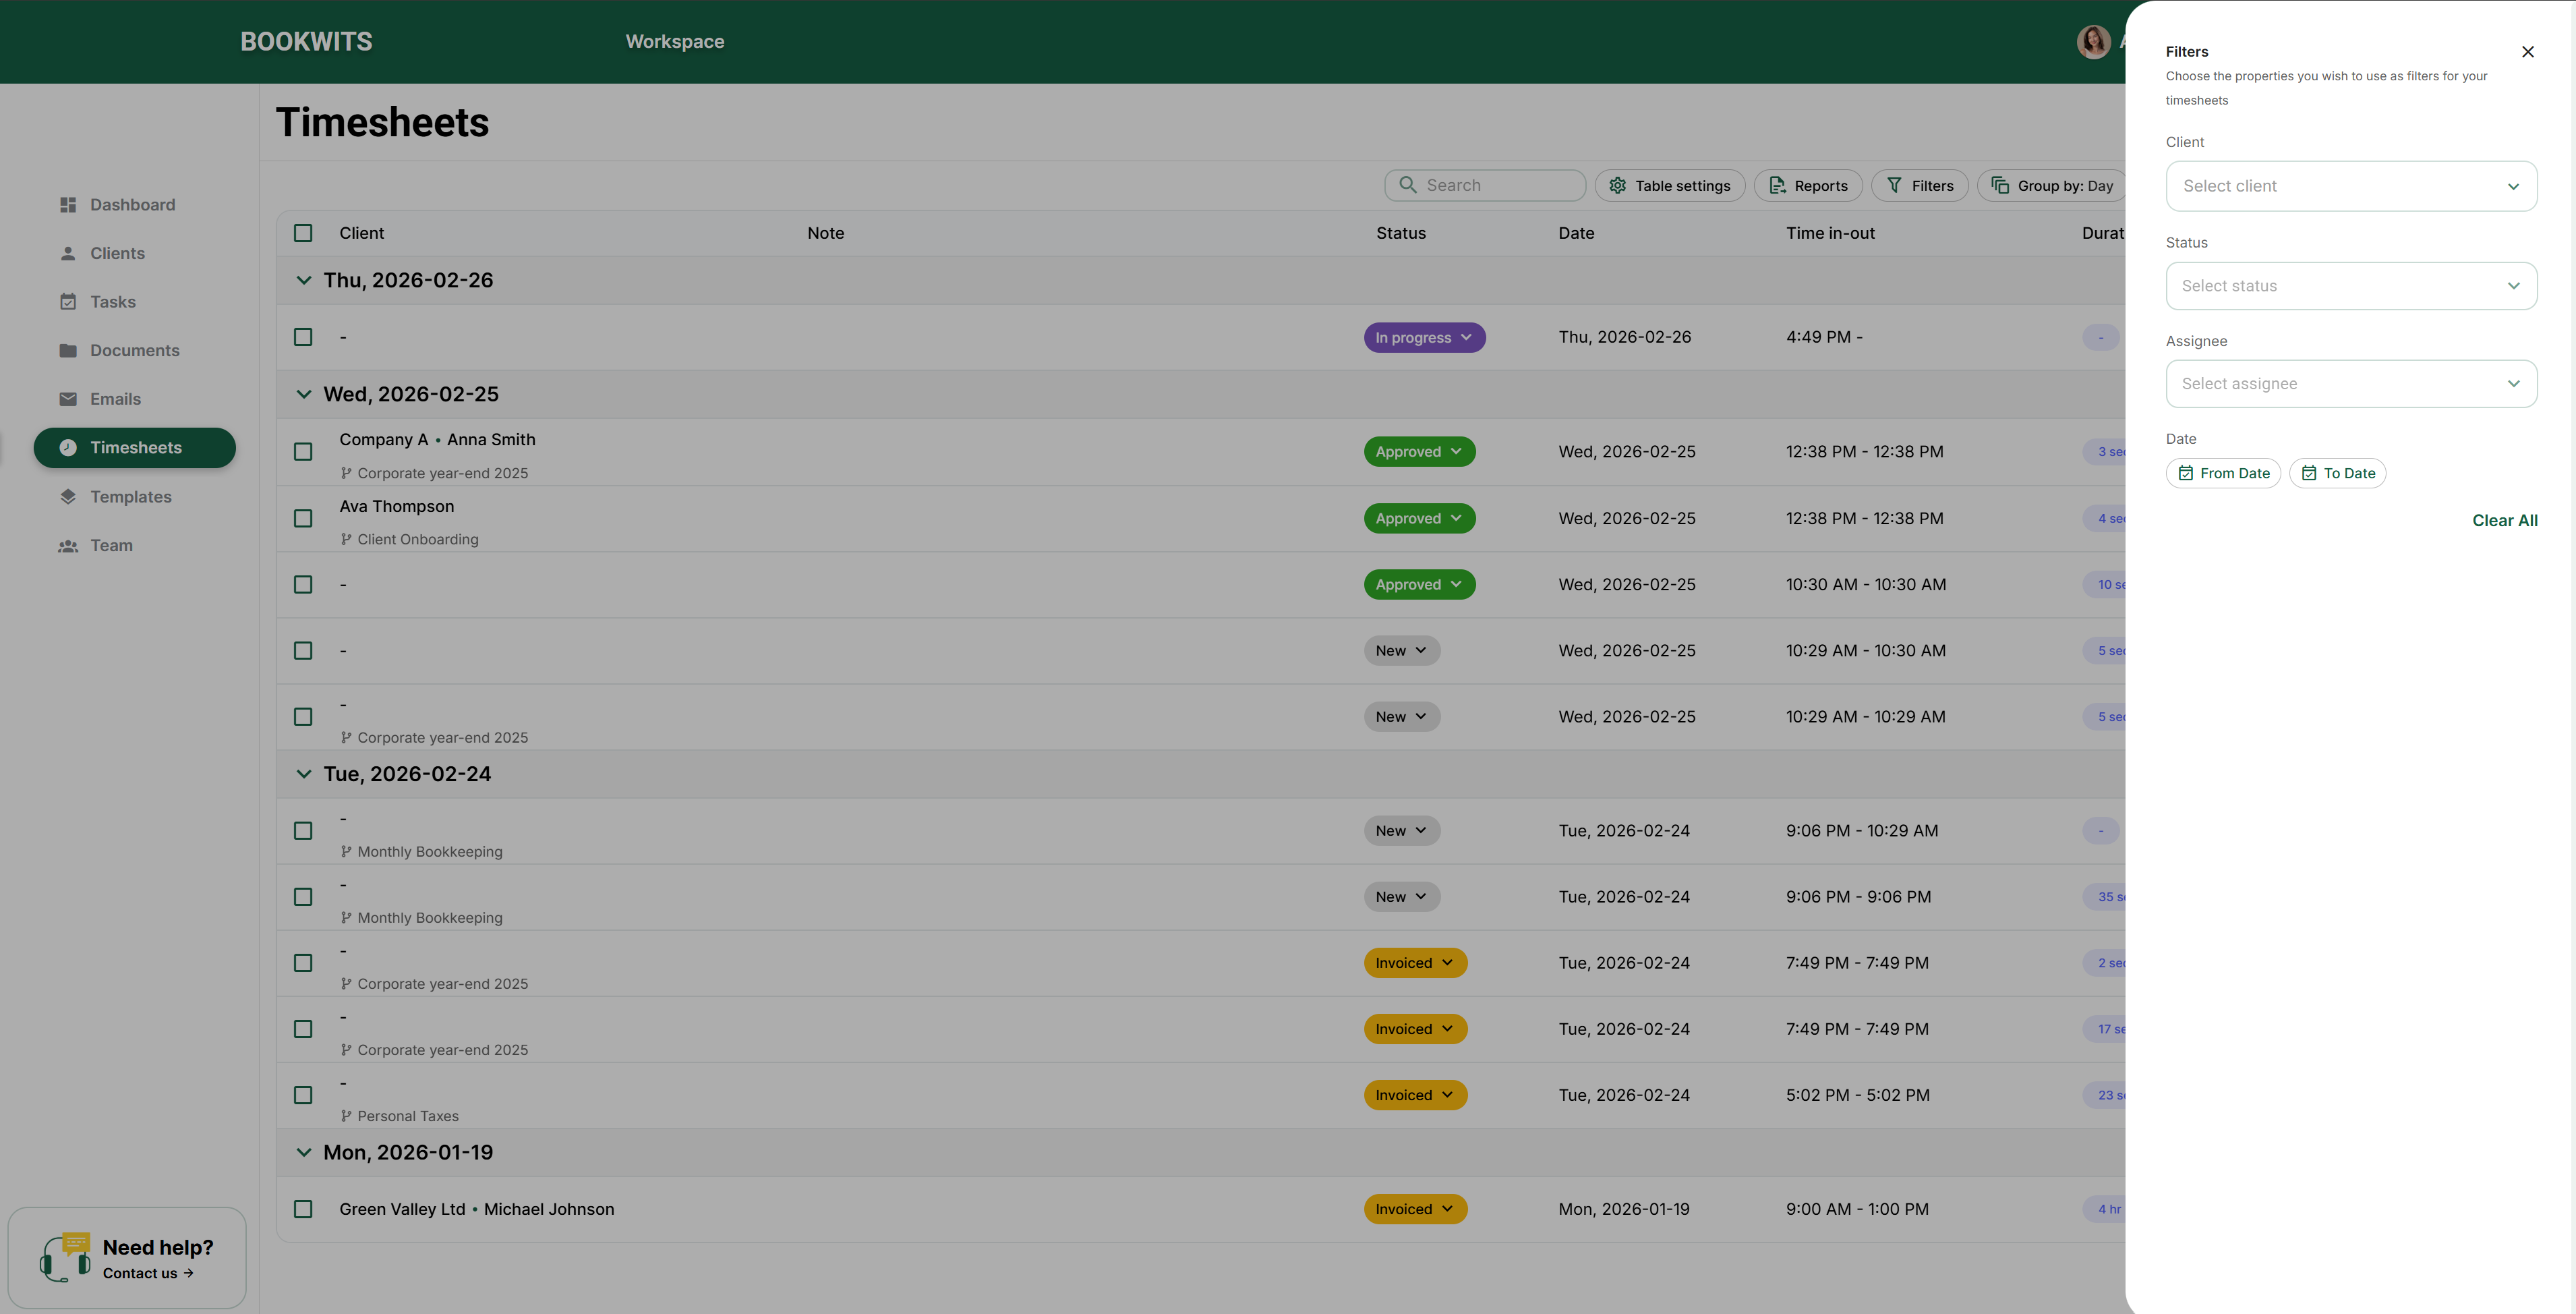
- Client
- Status
- Assignee (created by)
- Date range
If something “disappears,” it’s usually a filter still applied (especially
date range).
5) Submit time (New → Submitted)
When your entries are correct and ready:
- Select one or more entries using the checkboxes
- Click Submit (or change status to Submitted)
What this means
You’re telling the firm: “This is ready to review / approve.”
6) Approvals (Pending approval)
After submission, entries move into review:
Permissions (high level)
- Owner/Admin can see all timesheets
- Members can see only their own
What Owner/Admin can do during review
- Edit other users’ notes/descriptions
- Correct statuses
- Approve time for invoicing consistency
Why this exists: it standardizes entries for billing and prevents invoice
mistakes.
7) Invoice + export reports (CSV / XLS)
Generate a report
Click Generate report and export:
CSV
XLS
Mark entries as Invoiced (single or bulk)
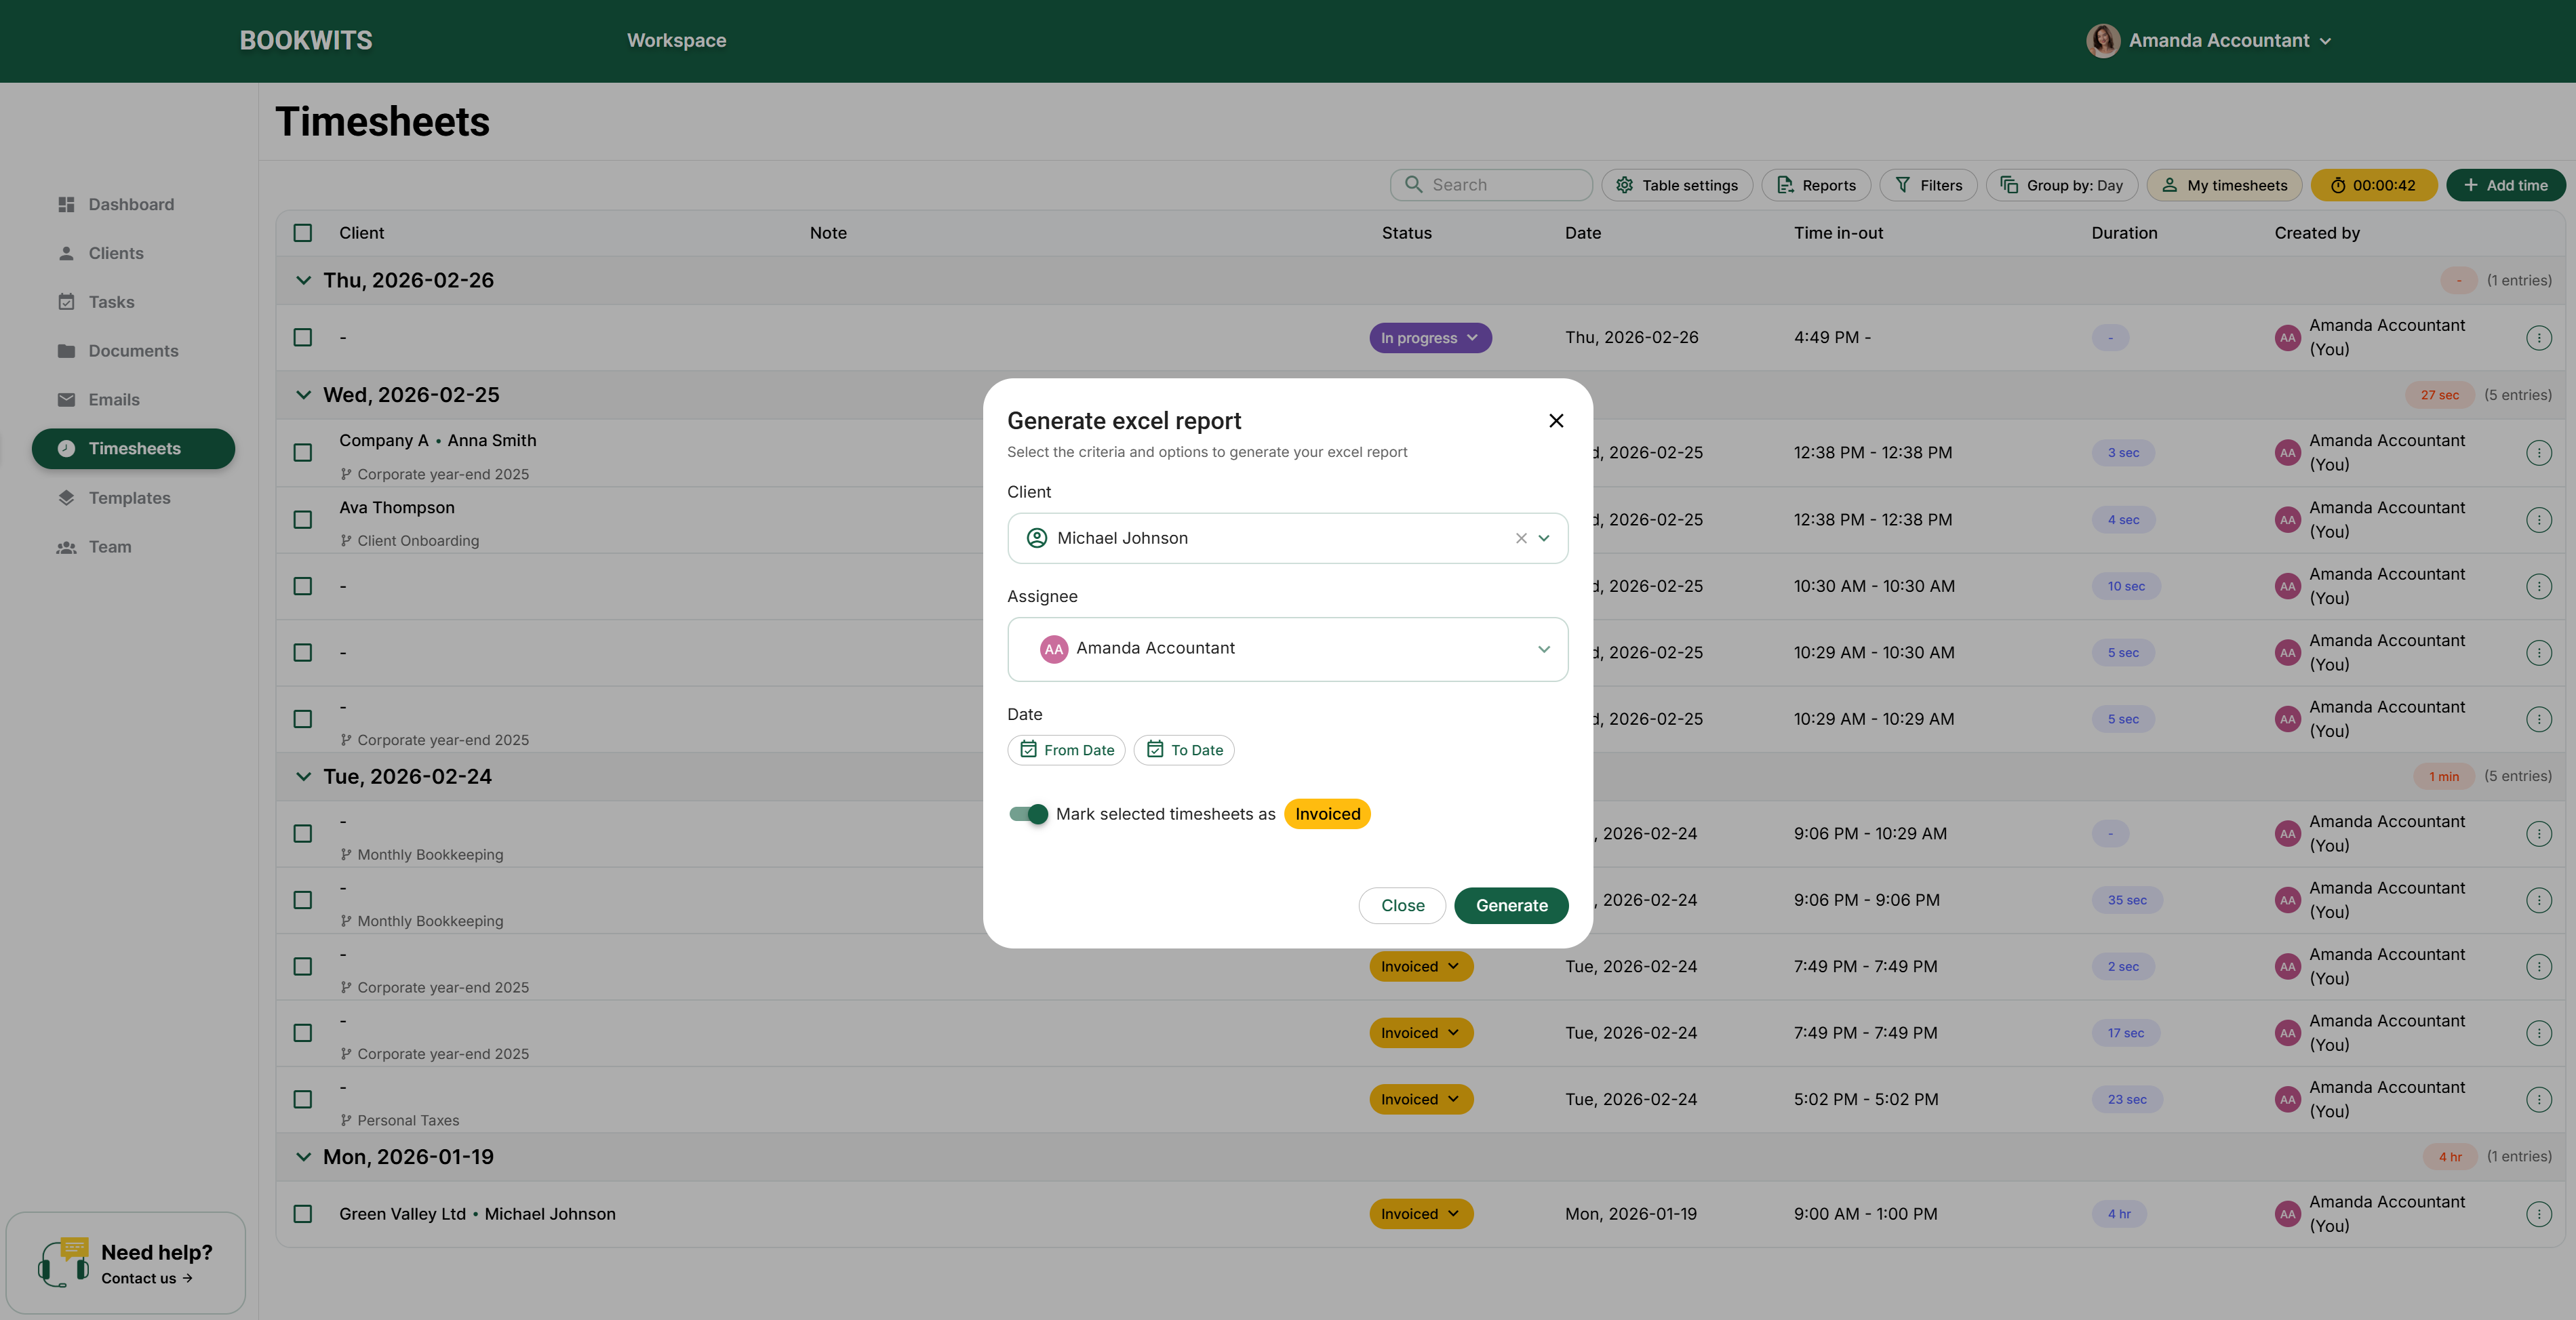
- Select entries via checkboxes
- Change status to Invoiced
What happens
- A report is generated for exactly the selected entries
- Statuses update to Invoiced
Why this matters: what you export is exactly what you marked billed—no
double billing, no missed time.
Quick best practices (new teams)
- Track from tasks whenever possible (best context).
- Keep notes short but billable (“Corporate year-end 2025 – review + adjustments”).
- Submit daily or weekly (consistency beats cleanup).
- Owners/Admins should review by Created by and bill by Client/Company.
- Once invoiced, treat entries as locked (even if editing is technically possible).
If you want, paste your exact UI labels for actions/buttons, and I’ll match
the wording 1:1.
Want help setting up a clean billing workflow?
Book a demo and we’ll help you set up status rules, review cadence, and
reporting views so invoicing is consistent and fast.